If you are choosing between Chimpmatic vs WP Fusion to connect Contact Form 7 submissions to Mailchimp, the right pick depends on the scope of your stack. In short, Chimpmatic is a surgical tool for one job — moving CF7 leads into Mailchimp audiences — while WP Fusion is a Swiss-army hub that connects WordPress to 60+ CRMs and marketing platforms. Both are well-built. Furthermore, both can deliver the form-to-Mailchimp outcome. However, they solve problems at very different price points and complexity levels.
Additionally, this guide compares Chimpmatic vs WP Fusion across the criteria that actually matter: price, Contact Form 7 setup time, multi-audience sync, GDPR consent capture, and ongoing maintenance. As a result, you can decide in two minutes whether the surgical $39-tier plugin or the platform-grade hub fits your use case better.
For broader context on plugin choice, see also the Chimpmatic vs MC4WP comparison — that one pits Chimpmatic against the most-installed free Mailchimp plugin on WordPress.
What Is Chimpmatic?
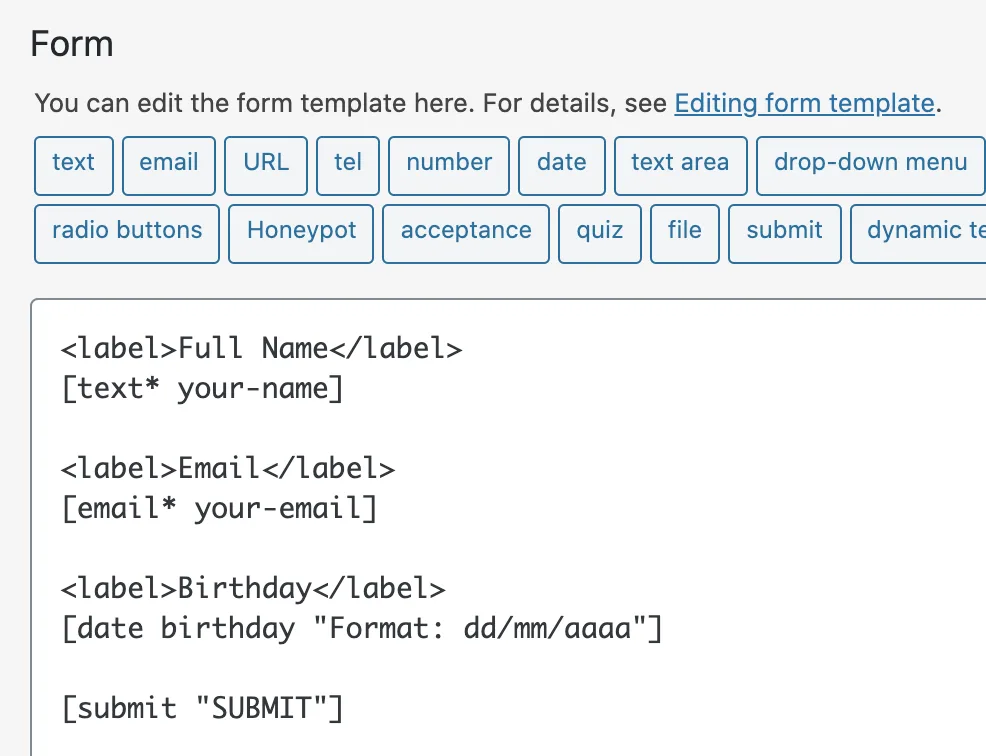
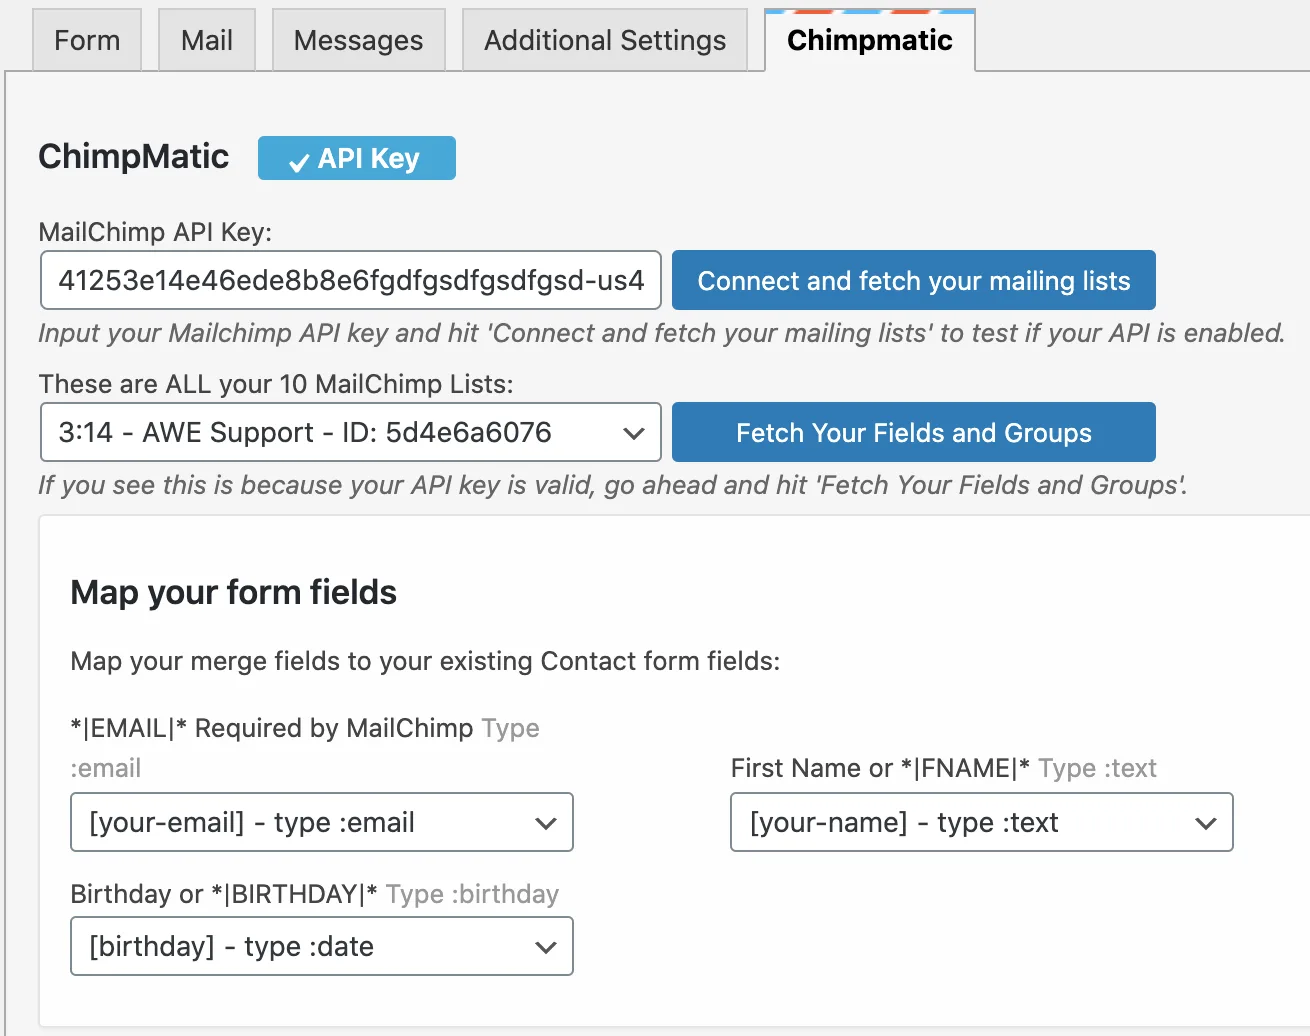
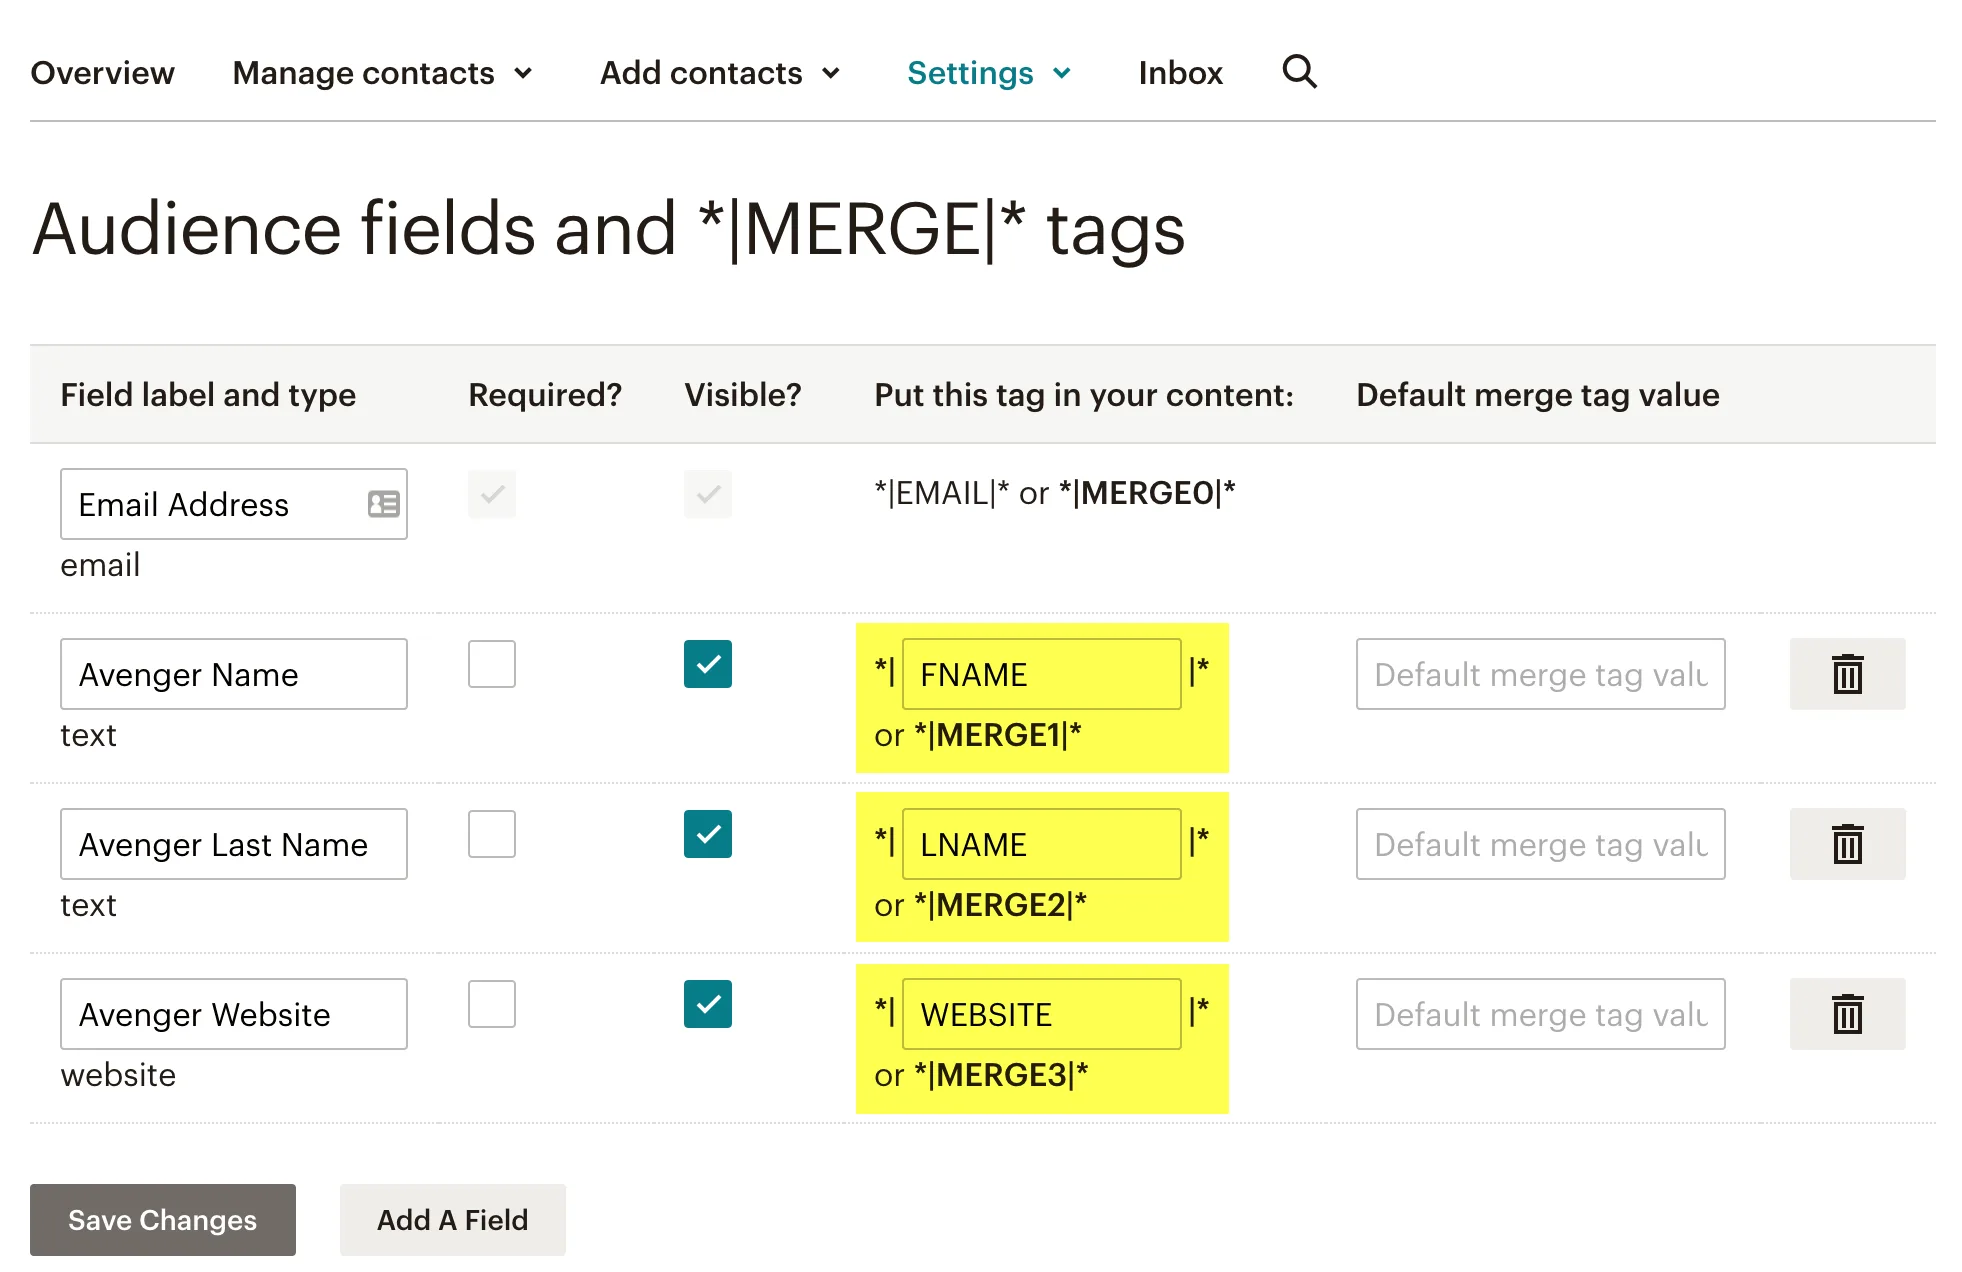
Chimpmatic is a WordPress plugin built to do one thing very well: route Contact Form 7 submissions into Mailchimp audiences. Specifically, it lets you map any CF7 field to any Mailchimp merge tag, sync a single form to multiple audiences in one submission, capture GDPR consent in line with Mailchimp’s API requirements, and tag subscribers based on form selections. The free Lite version ships on WordPress.org and has accumulated over fifty thousand active installs at the time of writing.
In other words, Chimpmatic sits in the layer between your contact form and your email marketing tool. It does not try to be a customer data platform. Moreover, it does not gate WordPress content behind tag membership or build automation flows inside WordPress. Instead, it makes the Mailchimp side of your funnel reliable and simple to configure — even for people who have never touched the Mailchimp API.
What Is WP Fusion?
WP Fusion is a premium WordPress plugin that connects your site to 60+ CRMs and marketing platforms — Mailchimp included, but also ActiveCampaign, HubSpot, Salesforce, Drip, ConvertKit, and many others. Importantly, it goes beyond moving data: it also lets you restrict WordPress content based on CRM tags, sync WooCommerce orders to your CRM, manage user roles based on tag membership, and trigger automations inside the CRM from user activity on your site.
Notably, WP Fusion is positioned as a marketing automation hub for the WordPress stack. Membership site operators, course creators, and ecommerce stores running on the Mepr / LearnDash / WooCommerce / EDD stack are its primary audience. Consequently, the feature surface is much wider than any single-purpose form-to-list connector — and the price reflects that.
Chimpmatic vs WP Fusion: The Quick Verdict
Here is the short answer for the Chimpmatic vs WP Fusion question: pick the tool that matches the actual scope of your problem. As a result, the verdict is not “X is better than Y” — both are well-engineered. Instead, the decision turns on whether you need a focused CF7-to-Mailchimp pipeline or a platform-grade hub for a much wider stack.
| Pick if you want… | Chimpmatic | WP Fusion |
|---|---|---|
| The simplest CF7 → Mailchimp setup | ✓ | ✓ (slower) |
| Multi-audience sync from one form | ✓ (native) | ✓ (via tag rules) |
| To connect to non-Mailchimp CRMs too | — | ✓ |
| Content gating by CRM tag | — | ✓ |
| WooCommerce → CRM sync | — | ✓ |
| Lowest annual cost | ✓ | — |
| A free version on WP.org | ✓ (Lite) | — |
In short, Chimpmatic wins when the job is “CF7 leads into Mailchimp” and stops there. Meanwhile, WP Fusion wins when the job extends to content gating, ecommerce sync, or a CRM other than Mailchimp.
Side-by-Side Feature Comparison
1. Contact Form 7 integration
Both plugins integrate with Contact Form 7, but the setup paths differ. Specifically, Chimpmatic installs as a native CF7 extension — the moment you activate it, your existing CF7 forms gain a “Mailchimp” tab in the form editor. You pick the audience, map fields, and save. Furthermore, no separate forms layer is required because Chimpmatic plugs directly into the CF7 mail-tags pipeline.
WP Fusion supports CF7 via its dedicated CF7 integration module. Additionally, it ships integrations for Gravity Forms, Formidable, WPForms, Elementor Forms, Forminator, and several others. As a result, if your stack uses more than one form plugin, WP Fusion handles all of them under one configuration surface. Therefore, the tradeoff is more setup steps for broader form-engine coverage.
2. Multi-audience sync
Chimpmatic supports sending a single CF7 submission to multiple Mailchimp audiences in one go. In particular, the Pro version handles conditional audience routing based on form field values — for instance, sending US visitors to one audience and EU visitors to another based on a country dropdown. WP Fusion handles the same outcome through its tag-based routing system, but the configuration lives at the user-meta and tag-link layer rather than the form layer. Consequently, the mental model is different even when the outcome matches.
3. GDPR consent
Both tools support double opt-in and explicit consent capture. Specifically, Chimpmatic ships a dedicated GDPR consent checkbox that maps to Mailchimp’s marketing-permissions API. Moreover, the consent state, IP, and timestamp are all submitted in the format Mailchimp expects for compliance audits. WP Fusion offers similar consent handling through its global consent settings and per-form overrides.
4. Content gating and access control
This is where the two tools genuinely diverge. WP Fusion lets you restrict pages, posts, blocks, menu items, and even WooCommerce products based on CRM tag membership. In contrast, Chimpmatic does not gate content at all — that is outside its scope. Therefore, if your business model depends on tagging contacts and then granting them access to specific WordPress content, WP Fusion is the right tool, not Chimpmatic.
5. Maintenance and updates
Both plugins are actively maintained. However, the scope of changes hitting each plugin differs. Chimpmatic updates focus on Mailchimp API compatibility and CF7 compatibility — narrow surface, predictable release notes. WP Fusion updates span 60+ CRMs and 150+ plugin integrations, so the release cadence is higher and the changelog is denser. Consequently, the upgrade risk profile is different in practice.
When Chimpmatic Wins
Pick Chimpmatic if any of the following describe your situation. First, you are using Mailchimp specifically — not ActiveCampaign, HubSpot, or another CRM. Additionally, the only data source you need to sync is Contact Form 7 submissions. Furthermore, the budget for the integration is constrained — Chimpmatic Lite is free, and Chimpmatic Pro is positioned at an entry-level annual price point.
In addition, Chimpmatic is the right pick if you want the integration set up in under five minutes. Specifically, the Lite version’s setup flow is: install, paste your Mailchimp API key, pick an audience, save. As a result, no training required, no separate documentation deep-dive. The plugin is a single-purpose tool that does the single purpose well.
When WP Fusion Wins
Pick WP Fusion if the integration is part of a wider marketing-automation stack. For example, if you also run a membership site on MemberPress or a course platform on LearnDash, WP Fusion’s content-gating-by-tag is the feature that justifies the price. Moreover, if you run WooCommerce and want every order to sync into your CRM as a contact with order-line-item tags, WP Fusion handles that natively.
Similarly, WP Fusion is the right pick if you are likely to switch CRMs in the next twelve to twenty-four months. Specifically, because it abstracts the CRM layer, you can swap Mailchimp for ActiveCampaign without rewriting your form integrations. As a result, the abstraction tax pays for itself over time when you outgrow Mailchimp.
Pricing Breakdown
Chimpmatic operates on a freemium model. Specifically, the Lite version on WordPress.org is free and covers single-audience CF7-to-Mailchimp sync. Chimpmatic Pro adds multi-audience sync, advanced field mapping, GDPR features, and priority support — see Chimpmatic Pro for the current Pro pricing tier.
WP Fusion is sold annually with three personal-to-business tiers. Notably, the entry Personal tier ($297) supports one site; the Plus tier ($427) adds enhanced ecommerce; the Professional tier ($647) unlocks unlimited sites. As a result, the total cost of ownership over a year is meaningfully different. In other words, the Chimpmatic-vs-WP-Fusion price gap reflects a Chimpmatic-vs-WP-Fusion scope gap, not a quality gap.
Common Questions
Can I migrate from WP Fusion to Chimpmatic later?
Yes. In short, switching costs are low because both tools sync to the same Mailchimp audiences. Specifically, contact records already in Mailchimp do not move when you switch the WordPress-side plugin — only the source of new submissions changes. Therefore, you can run both for a transition week and then deactivate WP Fusion.
Does Chimpmatic do everything WP Fusion does for Mailchimp?
For Mailchimp specifically, Chimpmatic covers the form-to-audience pipeline very well. However, content gating, WooCommerce sync, and CRM-tag-driven user roles are outside Chimpmatic’s scope. Consequently, if those features are part of your requirements, WP Fusion is the right pick.
Is WP Fusion worth it just for CF7-to-Mailchimp?
Honestly, probably not. Specifically, if Mailchimp is your only CRM and CF7 is your only form, you are paying for capability you will not use. As a result, the surgical Chimpmatic-vs-WP-Fusion verdict in that narrow case leans toward Chimpmatic.
What about Mailchimp for WordPress (MC4WP)?
MC4WP is the most-installed free Mailchimp plugin on WordPress. However, its CF7 support is thinner than Chimpmatic’s, and its multi-audience handling is more limited. See the dedicated Chimpmatic vs MC4WP comparison for the detailed breakdown.
Limitations to Know
- Chimpmatic is Mailchimp-only. Specifically, if you ever need to send the same form data to a second CRM, you will need a second tool.
- WP Fusion’s setup curve is steeper. However, that curve flattens once you understand the tag-link mental model.
- Both depend on Mailchimp’s API. Therefore, Mailchimp outages affect both equally.
Bottom Line
The Chimpmatic vs WP Fusion choice is not about which plugin is better. Instead, it is about which one matches your actual scope. In short, Chimpmatic is the right pick for CF7-to-Mailchimp specifically — fast to set up, free to start, and inexpensive to upgrade. Meanwhile, WP Fusion is the right pick when the integration is one node in a larger marketing-automation graph that includes content gating, ecommerce sync, or a CRM other than Mailchimp.
For most WordPress site owners who landed on this comparison after searching “Chimpmatic vs WP Fusion,” the honest answer is Chimpmatic. As a result, if that matches your situation, the Contact Form 7 Mailchimp overview is the next page to read.
Related Guides
- Chimpmatic vs MC4WP — the MC4WP comparison if you are also considering it.
- Contact Form 7 + Mailchimp — the canonical CF7-to-Mailchimp setup guide.
- Chimpmatic Pro — pricing and features if Chimpmatic is the pick.