Posted on

Mailchimp Merge Audiences: How to Combine Lists Safely

Short answer: Yes, you can merge multiple Mailchimp Audiences into one — but it is a permanent, one-way operation. Mailchimp offers two methods: the Combine Audiences tool (fast but loses tags, groups, engagement data, and GDPR permissions) and the Export/Import method (slower but preserves more data when you tag contacts during import). Always export every Audience to CSV before you start. This guide covers both methods, explains exactly what data transfers and what is lost, and shows you how to reconnect Contact Form 7 using Chimpmatic afterward.

Last updated: February 2026

Why Merge? The Cost of Audience Fragmentation

Most Mailchimp accounts accumulate multiple Audiences over time — “Newsletter,” “2024 Event,” “Website Signups,” “Test List.” This fragmentation creates three concrete problems:

  1. Higher costs. Mailchimp bills by total subscriber count. If one person appears in three Audiences, you pay for three contacts. Consolidating into a single Audience eliminates duplicate billing immediately.
  2. Data silos. Engagement history lives inside each Audience. You cannot see whether John Doe opened your event email if that data sits in a different Audience from your main newsletter. A single Audience gives you one complete customer view.
  3. Operational complexity. Managing automations, segments, and signup forms across multiple Audiences creates maintenance overhead that scales with every new list. One Audience with tags is simpler to maintain than five separate lists.

Choose Your Method: Combine Tool vs. Export/Import

Mailchimp provides two official methods for merging Audiences. They are not equivalent — the right choice depends on how much data you need to preserve.

Factor Combine Audiences Tool Export/Import with Tags
Speed Fast — a few clicks Slower — requires CSV export, tag setup, and import
Contacts moved Subscribed only All types (subscribed, unsubscribed, cleaned — separate imports)
Tags preserved No — tags do not transfer Yes — you assign tags during import
Groups preserved No — group data does not transfer Yes — you can map groups during import
Engagement data (opens, clicks) Lost Lost
Member ratings Lost Lost
Opt-in timestamps Lost — resets to merge date Lost — resets to import date
Signup source Lost Lost
GDPR permissions Lost — Mailchimp warns against this Lost — must re-collect consent
Custom merge fields Transfers if fields exist in destination Transfers if fields exist in destination
Best for Simple merges with basic data Merges where segmentation matters

Mailchimp’s recommendation: If you need to keep as much data as possible, use the Export/Import method. The Combine tool is only suitable when you want to merge subscribed contacts with basic field data (name, email) and do not need tags, groups, or GDPR records.

What You Lose: The Complete Data Transfer Matrix

Merging is not a lossless operation regardless of which method you choose. Here is exactly what does and does not survive, based on Mailchimp’s official documentation:

Data that transfers

  • Email address
  • Name and other standard merge fields (FNAME, LNAME)
  • Custom merge field values — only if the same fields exist in the destination Audience
  • Subscription status (Combine tool: subscribed only; Export/Import: all types via separate imports)

Data that is permanently lost

  • Tags — not transferred by the Combine tool; must be manually recreated via Export/Import
  • Groups — not transferred by the Combine tool
  • Email engagement metrics — opens, clicks, and campaign history from the source Audience
  • Member ratings — the 1-to-5-star contact rating resets
  • Opt-in timestamps — the original signup date resets to the merge/import date
  • Signup source — where the contact originally subscribed (form, import, API) is lost
  • GDPR marketing permissions — consent records do not transfer
  • Automation queue positions — contacts enrolled in Customer Journeys or Classic Automations tied to the source Audience lose their place

Why this matters: If you rely on engagement-based segments (e.g., “opened 3+ emails in the last 90 days”) or GDPR consent records, those segments will break after merging because the underlying data no longer exists. Plan for this before you start.

Pre-Merge Safety Checklist

Complete every item on this list before touching the Combine tool or starting an import. Skipping a step can result in permanent data loss or accidental automation triggers.

  1. Export every Audience to CSV. Go to Audience > All contacts > Export audience. Do this for every Audience, including the one you plan to keep as the master. Store these files somewhere safe — they are your only backup.
  2. Audit your Audiences. List every Audience, its subscriber count, and whether it is actively receiving campaigns. Identify which one becomes the “primary” (master) Audience — typically the largest or the one with the most engagement history.
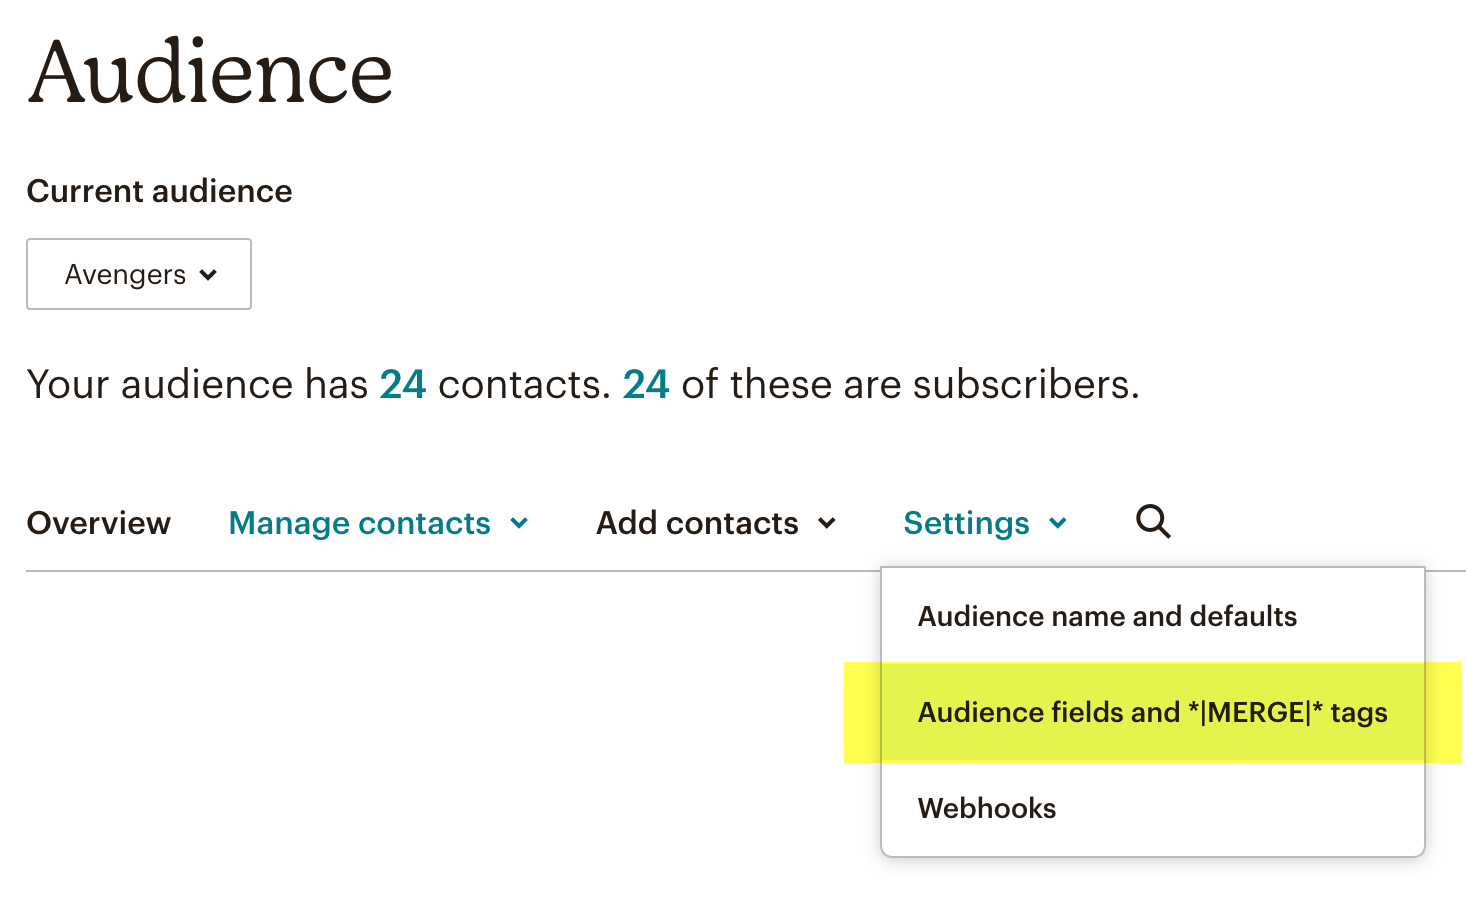
  3. Create custom merge fields in the master Audience. If source Audiences have custom fields (Company, Phone, Birthday), create matching fields in the master before merging. Fields that do not exist in the destination are silently dropped.
  4. Create tags in the master Audience. For each source Audience, create a tag like Source: Newsletter-2024 or Source: Event-Signups. You will use these to preserve segmentation after the merge.
  5. Pause all automations on the master Audience. The Combine Audiences tool triggers automations with “Signs up” or welcome email triggers for every contact it moves. If you do not pause these automations first, every merged contact will receive your welcome email sequence. Pause first, merge, then manually remove the imported contacts from the automation queue before resuming.
  6. Check the 7-day cooling period. Mailchimp requires a 7-day wait after sending to or using an Audience before you can combine it. If you sent a campaign yesterday, you must wait before merging.
  7. Check for GDPR-enabled Audiences. Mailchimp explicitly warns: “We recommend that you don’t combine audiences that are GDPR-enabled.” If any of your Audiences use GDPR fields, use the Export/Import method instead and plan to re-collect consent from affected subscribers.

Method A: Combine Audiences Tool (Fast, Lossy)

Use this method when you need a quick merge of subscribed contacts with basic field data and do not need to preserve tags, groups, or GDPR records. This is best for cleaning up small, inactive, or test Audiences.

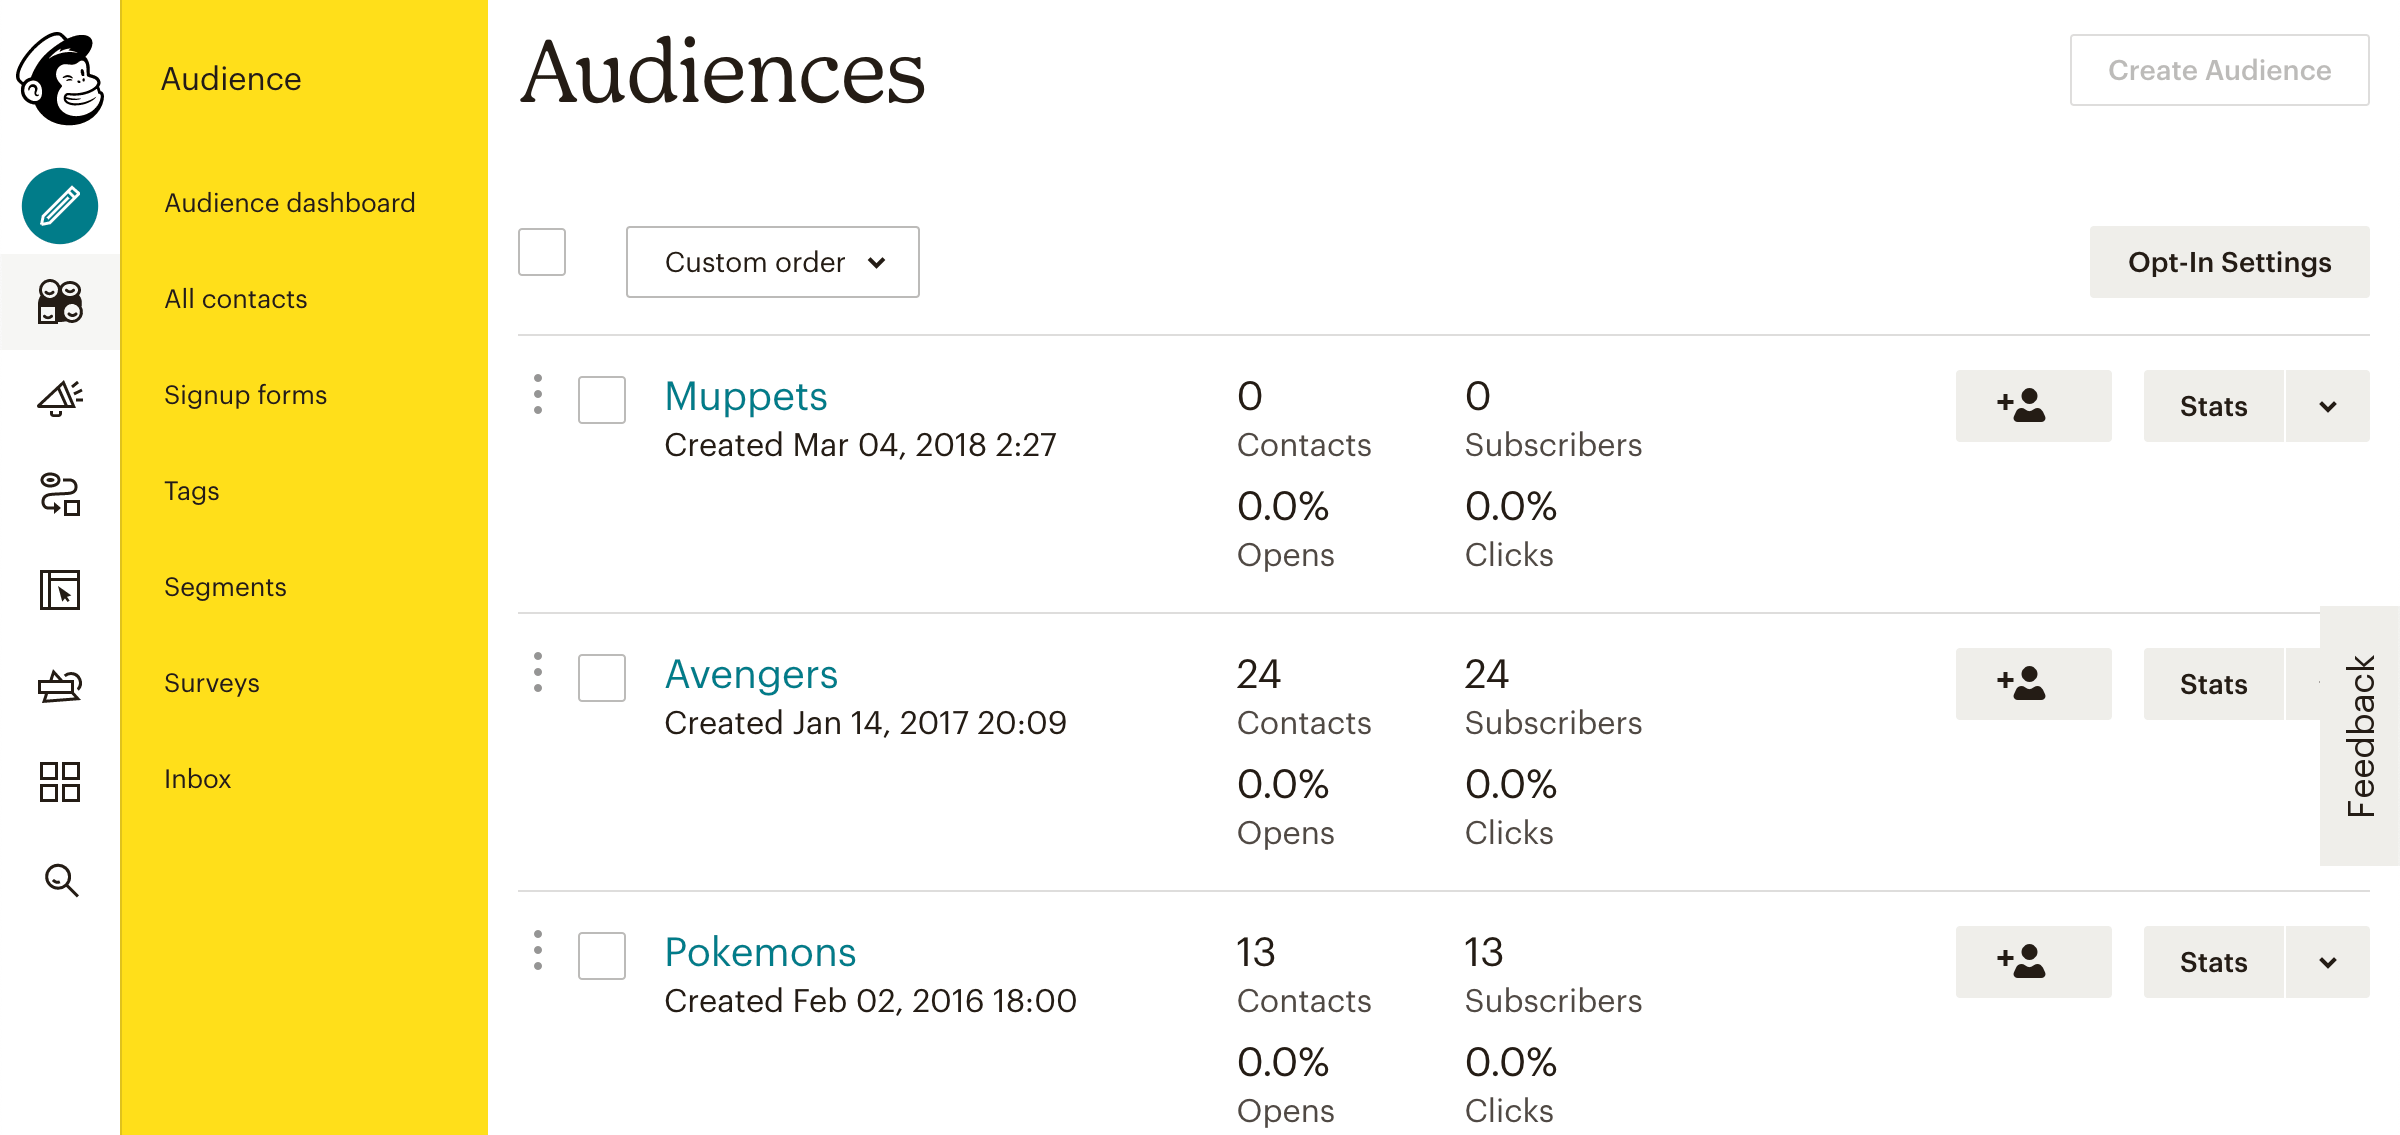
  1. Log in to Mailchimp and go to Audience > All contacts.
  2. Click the Manage Audience dropdown and select Manage audiences.
  3. Find the source Audience you want to merge from and click Manage audience > Combine audiences.
  4. Select your primary (master) Audience from the dropdown — this is where contacts will be moved to.
  5. Click Next. Optionally select groups to add contacts to in the destination.
  6. Review the data loss notification carefully.
  7. Type CONFIRM and click Combine audiences.

Only subscribed contacts move. Unsubscribed, non-subscribed, and cleaned contacts are not transferred — they remain in the source Audience until you delete it. If you need those records, use Method B.

Method B: Export/Import with Tags (Slower, Safer)

This is Mailchimp’s recommended method when you need to preserve segmentation. It takes longer but gives you control over what data moves and how contacts are organized afterward.

  1. Export the source Audience. Go to Audience > All contacts > Export audience. Download the CSV. This file contains all contacts and their field data.
  2. Create a tag in the master Audience. Name it after the source Audience (e.g., Source: Newsletter-2024). This tag will be applied to every imported contact so you can segment them later.
  3. Import subscribed contacts. Go to your master Audience > Add contacts > Import contacts > CSV file. Upload the exported file. During import, assign the tag you just created. Map each column to the correct merge field.
  4. Import unsubscribed contacts as a suppression list. This ensures unsubscribed contacts from the old Audience remain unsubscribed in the master Audience. Mailchimp treats suppression imports differently from regular imports.
  5. Import cleaned (bounced) contacts. Similar to the suppression import — this prevents you from accidentally emailing addresses that have hard-bounced.
  6. Verify the import. Check the master Audience subscriber count. Filter by the new tag to confirm contacts appear correctly. Spot-check a few records to verify merge field data transferred.
  7. Archive the source Audience. Once you have confirmed the import is complete, archive (do not delete) the source Audience. Archiving preserves the data for reference while removing it from your active billing.

Repeat this process for each Audience you want to consolidate. Each import gets its own tag, so you can always filter your master Audience by original source.

Reconnecting Contact Form 7 via Chimpmatic

After merging Audiences in Mailchimp, your WordPress forms may still point to deleted or archived Audiences. Every form must be updated to target the new master Audience.

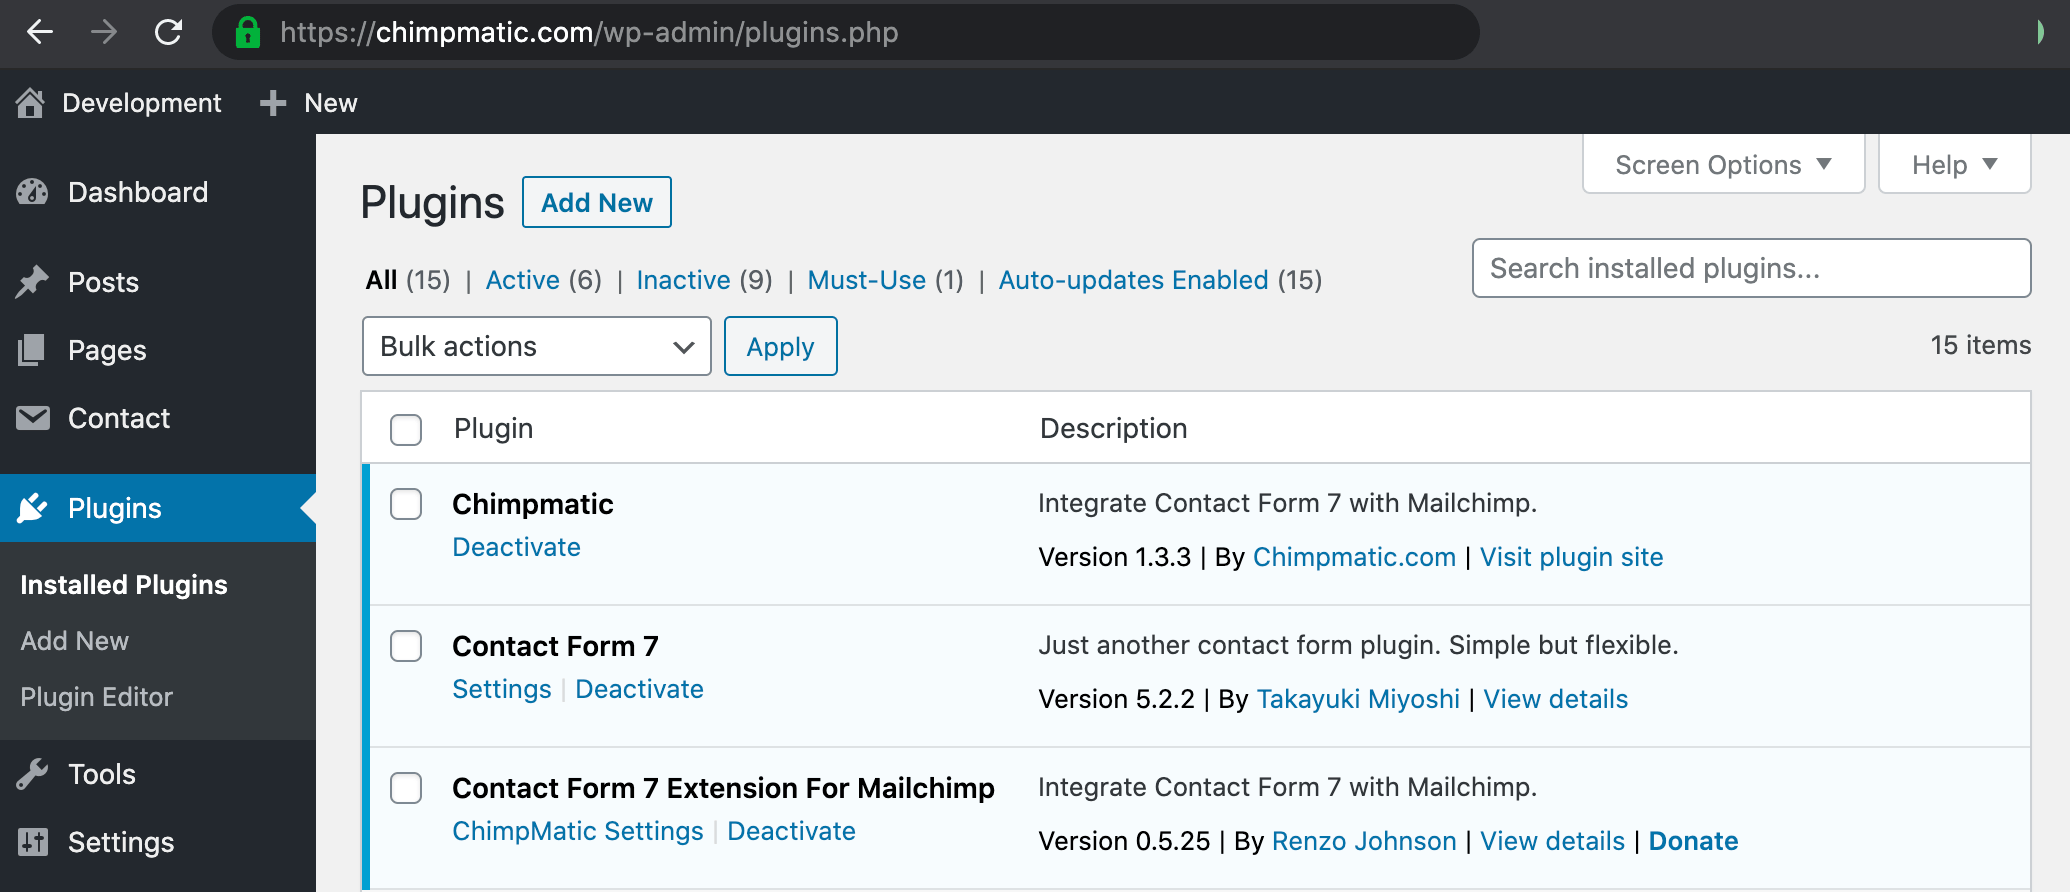
  1. Open WordPress and go to Contact > Contact Forms.
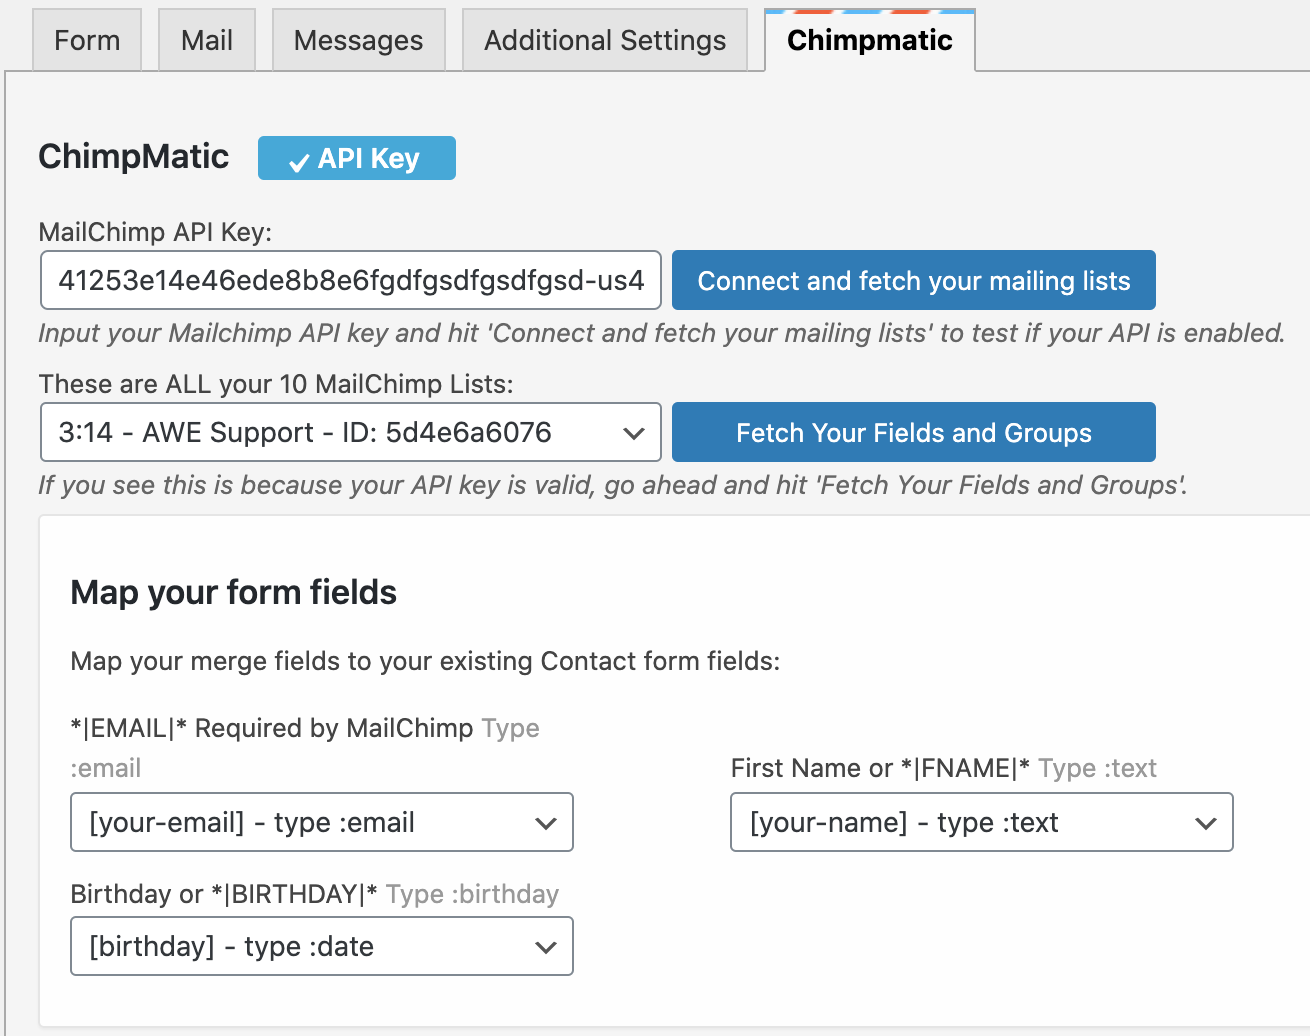
  2. Edit the first form and click the ChimpMatic Lite (or ChimpMatic Pro) tab.
  3. Click Connect and Fetch Your Mailing Lists to refresh the Audience list from the API.
  4. Select the new master Audience from the dropdown.
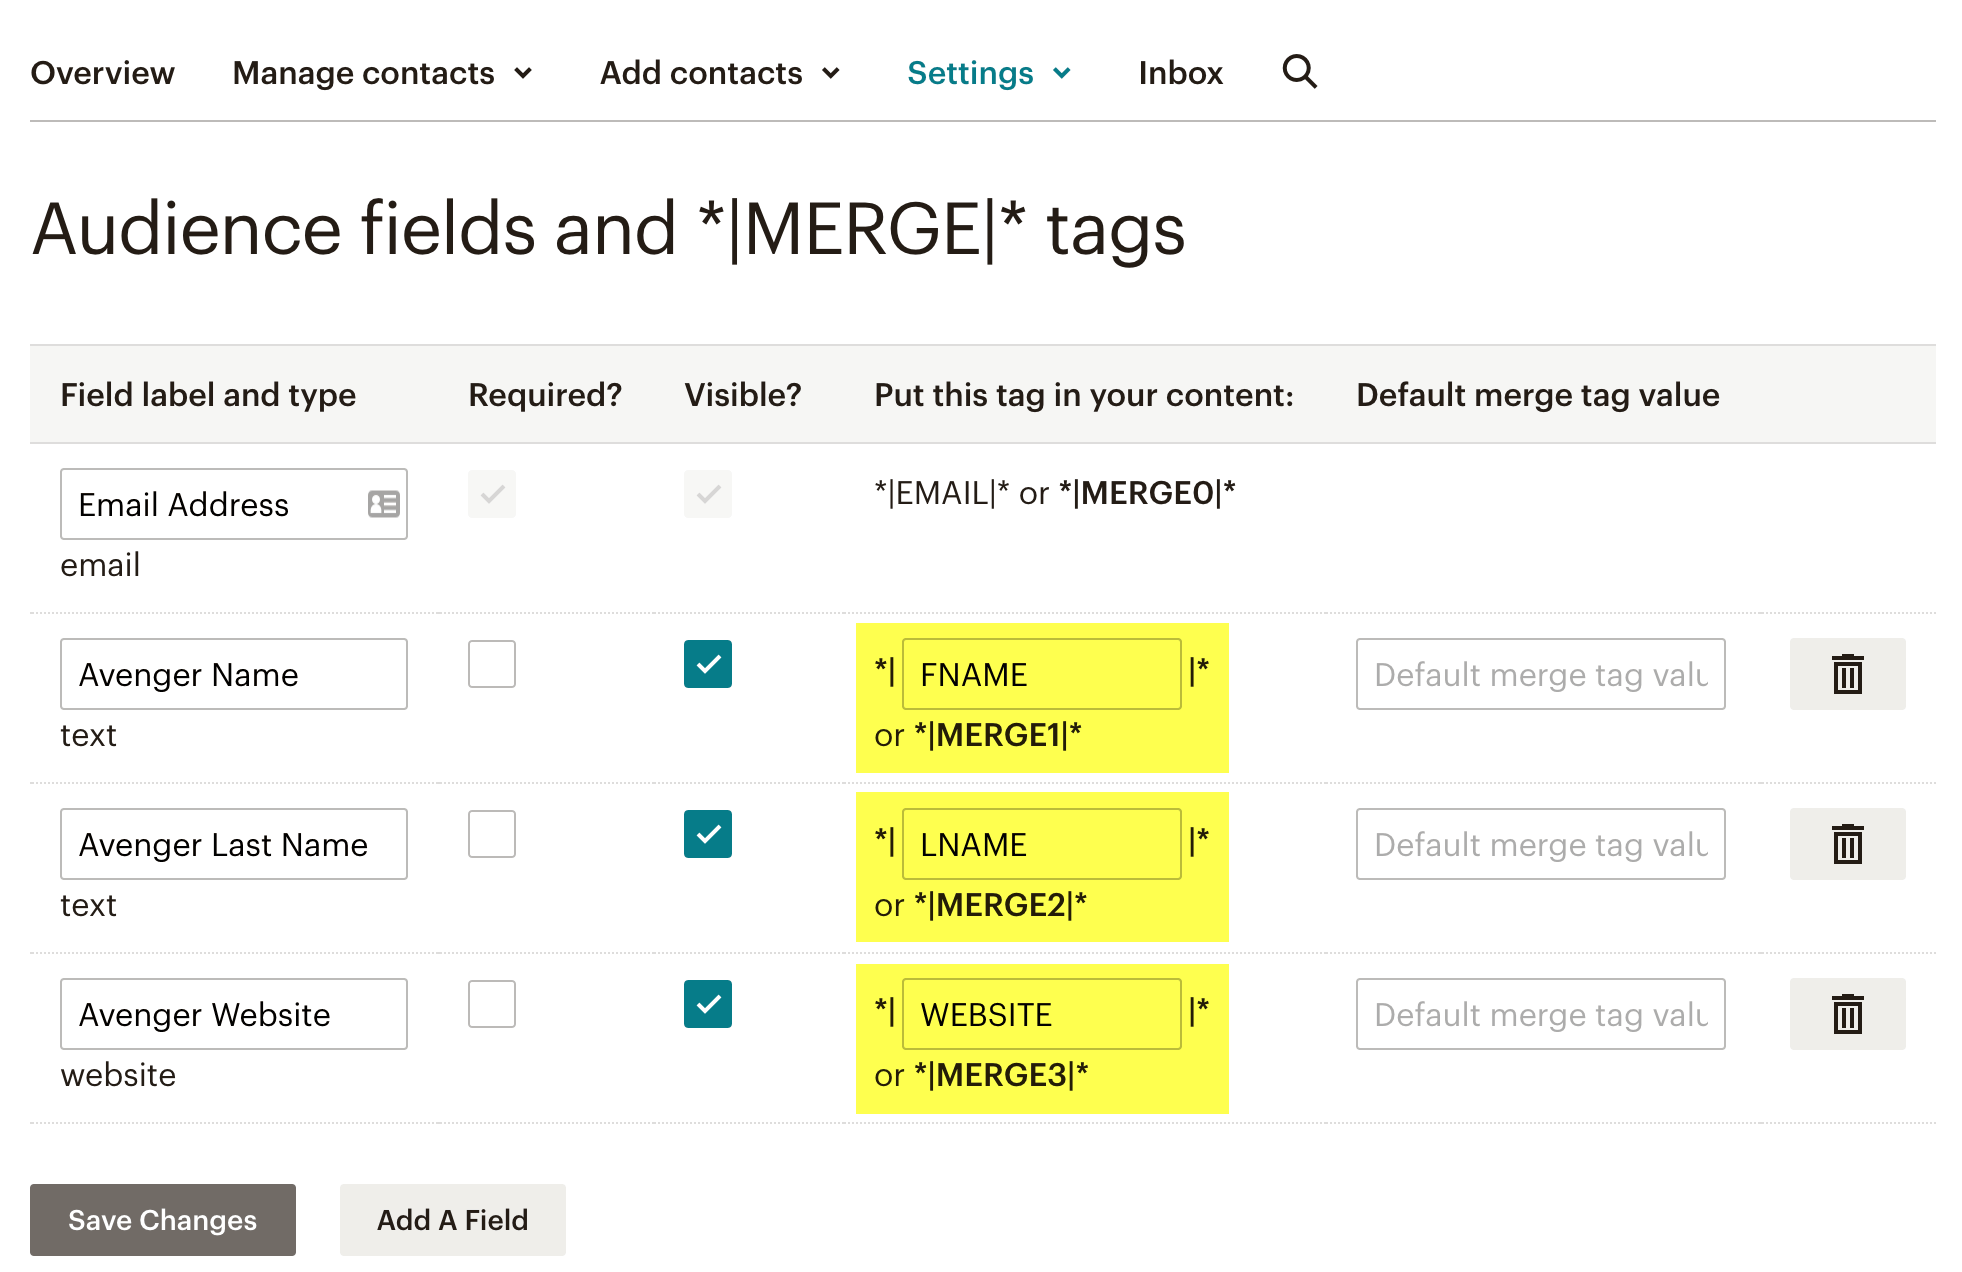
  5. Verify the field mapping — ensure Email, FNAME, LNAME, and any custom fields are mapped to the correct merge tags in the master Audience.
  6. If you use the Pro version, add a tag in the Tags field (e.g., Source: Contact Page or Source: Newsletter Form). This tag is applied at submission time and maintains the segmentation you built during the merge.
  7. Click Save.
  8. Repeat for every CF7 form on your site.

After updating all forms, submit a test entry on each form and confirm the subscriber appears in the correct master Audience with the expected tag and field data.

Troubleshooting Post-Merge Issues

Problem Cause Fix
“Member Exists” errors Contact already in master Audience Mailchimp updates the profile — this is normal behavior
Missing custom field data Field did not exist in master Audience Create the field first, then re-import
Welcome emails fired for merged contacts Automation with “Signs up” trigger was active Pause automations before merging; remove contacts from queue
Unsubscribed contacts missing Combine tool only moves subscribed contacts Use Export/Import method for unsubscribed contacts
Tags and groups disappeared Combine tool does not transfer tags or groups Use Export/Import method and tag during import
GDPR permissions lost Neither method transfers GDPR data Re-collect consent via a re-confirmation campaign
CF7 forms sending to wrong Audience Form still targets old Audience ID Update Chimpmatic settings and re-fetch lists

1. “Member Exists” Errors

When a contact from a source Audience already exists in the master Audience, Mailchimp updates their profile with any new field data rather than creating a duplicate. This is expected behavior. If you see this during a CSV import, it means the contact was already in your master list — their record is updated, not lost. Chimpmatic handles this gracefully on the WordPress side as well.

2. Missing Custom Field Data

If a merge field exists in the source Audience but not in the master, the data is silently dropped during merging. The fix: create all necessary custom fields in the master Audience before combining or importing. Then re-import the CSV to populate the missing data.

3. Welcome Emails Fired for Merged Contacts

The Combine Audiences tool triggers any automation with a “Signs up” or welcome email trigger on the master Audience. Every moved contact is treated as a new signup. To avoid this: pause all automations before merging, combine the Audiences, then open the automation and manually remove the imported contacts from the queue before resuming.

4. Unsubscribed Contacts Missing

The Combine Audiences tool only moves subscribed contacts. Unsubscribed, non-subscribed, and cleaned contacts stay in the source Audience. If you need these records in the master, use Method B (Export/Import) and import them as a suppression list to preserve their unsubscribed status.

5. Tags and Groups Disappeared

The Combine Audiences tool does not transfer tag or group data. This is a documented limitation. The only way to preserve segmentation is Method B — create tags in the master Audience before importing, then assign each batch of imported contacts to the appropriate tag.

6. GDPR Permissions Lost

Neither method transfers GDPR marketing permissions. If your Audiences use GDPR fields, Mailchimp explicitly recommends not combining them. After merging, you must re-collect consent. The safest approach: send a re-confirmation campaign to merged contacts asking them to opt in again. Without valid consent records, you risk non-compliance.

7. CF7 Forms Sending to Wrong Audience

After merging, your CF7 forms may still reference the old Audience ID. Open each form in WordPress, go to the Chimpmatic tab, click Connect and Fetch Your Mailing Lists to refresh, select the master Audience, verify field mapping, and save. Test each form afterward.

Post-Merge Cleanup Steps

Remove Near-Duplicate Contacts

Mailchimp prevents exact email duplicates within one Audience, but near-duplicates can slip through (e.g., john@gmail.com vs. john.doe@gmail.com). Export your master Audience to a spreadsheet, sort by name, and look for contacts that appear to be the same person with different email addresses. Archive the outdated entry to keep subscriber counts and billing accurate.

Clean Up Unsubscribed and Bounced Contacts

After merging, review the “Non-subscribed,” “Unsubscribed,” and “Cleaned” segments in your master Audience. Contacts in these segments do not count toward your billing, but they clutter your reports. Archive contacts that have been bounced for more than a year or have been unsubscribed for an extended period. This improves your Audience health score and clarifies campaign analytics.

Re-Test All Automations

Customer Journeys and Classic Automations tied to source Audiences stop working after those Audiences are merged or archived. Review every active automation in Mailchimp and verify that triggers (tags, signup activity, field changes) reference valid data in the master Audience. Submit test forms on your website and follow the complete journey from submission through final email delivery. End-to-end testing is the only guarantee that nothing broke during migration.

Update Signup Forms and Landing Pages

Mailchimp signup form URLs are tied to specific Audiences. If you embedded forms or linked to hosted signup pages for old Audiences, those forms will either break or add contacts to a deleted Audience. Update every embedded form and landing page to reference the master Audience. Check your website footer, sidebar widgets, pop-ups, and any third-party integrations that point to Mailchimp signup URLs.

Frequently Asked Questions

Can you merge two Mailchimp Audiences?

Yes. Mailchimp provides a built-in Combine Audiences tool that moves subscribed contacts from one Audience to another. However, it only transfers basic field data — tags, groups, engagement metrics, and GDPR permissions do not transfer. For more control, export from the source Audience and import into the master Audience with tags.

What happens to tags when you merge Mailchimp Audiences?

Tags do not transfer when using the Combine Audiences tool. They are permanently lost. To preserve segmentation, use the Export/Import method: create tags in the master Audience before importing, then assign each batch of imported contacts to the appropriate tag during the import step.

Does merging Mailchimp Audiences delete subscribers?

No. The Combine tool moves subscribed contacts to the master Audience — it does not delete them. However, unsubscribed, non-subscribed, and cleaned contacts are not moved and remain in the source Audience. If you delete the source Audience afterward, those records are gone.

Is merging Mailchimp Audiences reversible?

No. Combining Audiences is a permanent, one-way operation. Mailchimp cannot undo it. This is why exporting all Audiences to CSV before you start is critical — those files are your only rollback option.

Can I merge GDPR-enabled Audiences in Mailchimp?

Mailchimp explicitly recommends against it. GDPR marketing permissions do not transfer during a merge. If you combine GDPR-enabled Audiences, you lose consent records for every moved contact. Use the Export/Import method instead and plan a re-confirmation campaign to re-collect consent.

Why do I have to wait 7 days before combining Audiences?

Mailchimp enforces a 7-day cooling period after you send to or use an Audience before it can be combined. This prevents accidental merges immediately after a campaign and gives time for engagement data to settle.

Will merging Audiences trigger welcome emails?

Yes, if your master Audience has an active automation with a “Signs up” or welcome email trigger. The Combine tool treats every moved contact as a new signup, which fires the automation. Pause all automations before merging, then manually remove the imported contacts from the automation queue before resuming.

How do I reconnect Contact Form 7 after merging Audiences?

Open each CF7 form in WordPress, go to the Chimpmatic tab, click Connect and Fetch Your Mailing Lists to refresh the API data, select the new master Audience, verify field mapping, and save. Repeat for every form. The Pro version lets you add tags at submission time to maintain segmentation.

Does Chimpmatic handle duplicate subscribers after a merge?

Yes. When a CF7 form submits a contact that already exists in the master Audience, Chimpmatic updates the existing profile with any new data rather than failing. This is the same behavior as Mailchimp’s native duplicate handling.

Should I use one Audience with tags or multiple Audiences?

Mailchimp recommends one primary Audience with tags for most use cases. Tags give you the same segmentation as separate Audiences without the duplicate billing, data silos, or operational complexity. Multiple Audiences are only justified when you need completely separate branding, compliance rules, or sending domains.

Master Your Mailchimp Data

After merging your Audiences, Chimpmatic Pro keeps your WordPress forms organized with per-form tags, advanced field mapping, and group support — so every subscriber lands in the right segment from day one.

See Pro Features & Pricing

Next Steps

Posted on

How to Sync Contact Form 7 with Multiple Mailchimp Audiences (2026)

TL;DR: Multi-Audience Syncing

Connecting Contact Form 7 to multiple Mailchimp audiences is a common requirement for agencies and multi-brand businesses. While Chimpmatic Lite limits you to one audience per form, Chimpmatic PRO allows you to route unlimited forms to unlimited different audiences, or even sync a single submission to multiple lists simultaneously.

One of the most persistent myths in the WordPress ecosystem is: “You can only connect one Mailchimp API key to one website.”

This is false. Yet, many plugins impose artificial limits, forcing you to hook up your entire website to a single Mailchimp Audience. In reality, modern businesses often need far more complexity than that.

Whether you are running a multi-language site, managing several brands under one domain, or simply keeping your “Wholesale” and “Retail” customers completely separated for legal reasons, you need the ability to sync with Multiple Mailchimp Audiences.

3 Ways to Handle Multiple Audiences

  1. Form-Based Routing (Lite/PRO): Form A goes to Audience A. Form B goes to Audience B.
  2. Simultaneous Sync (PRO Only): One form submission is sent to Audience A AND Audience B at the same time.
  3. Conditional Routing (PRO Only): If user selects “USA”, send to US-Audience. If “EU”, send to EU-Audience.

1. Why Use Separate Audiences? (The Debate)

Mailchimp often advises users to put everyone in a single audience and use Tags/Groups to organize them. (See our article on Merging Audiences for why this is usually good advice).

However, “usually” isn’t “always.” Here are valid reasons to use separate audiences:

  • Data Isolation (GDPR/CCPA): You cannot legally store EU customer data in the same bucket as US data due to specific consent logs.
  • Distinct Brands: You run “CoolShoes.com” and “WarmSocks.com” from the same WordPress install, and the branding is totally different.
  • Internal vs. External: You have an “Employees” list and a “Customers” list. You never want to accidentally email the wrong group.

2. Method 1: The “One Form, One Audience” Approach

This is the most common setup and is supported by Chimpmatic Lite.

In this scenario, you simply create multiple forms in Contact Form 7. Form 1 (Sidebar) is mapped to “Newsletter Audience.” Form 2 (Checkout) is mapped to “Customers Audience.”

Because Chimpmatic settings are saved per form instance, you can simply open Form 1, select Audience A, save it. Then open Form 2, select Audience B, save it. There is no global setting that overrides this. You have total freedom to map 100 different forms to 100 different audiences if you wish.

3. Method 2: Syncing One Form to Two Audiences (PRO)

What if you want a single “Sign Up” form to add the user to your “Weekly Newsletter” audience AND your “Daily Deals” audience?

With standard plugins, this is impossible. The API connection usually handles one request per submission.

Chimpmatic PRO introduces a feature called “Multi-Sync Actions.” This allows you to chain API requests. When a user hits submit: Chimpmatic sends data to Audience A, then sends data to Audience B, and finally displays the “Success” message.

This ensures that your data is perfectly replicated across both silos without the user having to fill out two forms.

Need Complex Data Routing? Stop hacking together workarounds. Chimpmatic PRO is built for complex agency needs, allowing multi-audience syncing and conditional logic out of the box.

4. Method 3: Conditional Audience Routing (PRO)

This is the “Holy Grail” for international businesses.

Imagine a form with a dropdown: “Select your Region.” Options include North America, Europe, and Asia.

With Conditional Routing, you can tell Chimpmatic: IF “North America” is selected, send to “US Audience.” IF “Europe” is selected, send to “EU Audience.”

This keeps your compliance team happy and your open rates high, because you are ensuring subscribers only end up in the list relevant to their location.

5. The Cost Implication

Before you go creating dozens of audiences, remember how Mailchimp billing works. You pay per subscriber, per audience.

Scenario Subscriber Count You Pay For…
john@example.com in Audience A 1 1 Subscriber
john@example.com in Audience A + Audience B 1 person, 2 lists 2 Subscribers

If you duplicate your entire list across two audiences, you effectively double your Mailchimp bill. Always ask yourself: “Could I use a Tag for this instead?” If the answer is yes, check out our Tagging Guide.

6. Best Practices for Multi-Audience Management

If you decide to proceed with multiple audiences, follow these rules to keep your sanity:

  1. Standardize Field Names: Ensure FNAME is “First Name” in every single audience. Don’t name it FNAME in one and FIRST_NAME in another, or your field mapping will be a nightmare.
  2. Use Global API Keys: While you can use different API keys for different forms (e.g., if you are an agency managing client sites), it’s best to keep everything under one master account if possible for easier billing.
  3. Test Every Route: If you use conditional routing, manually test every single dropdown option to ensure the data lands in the correct bucket.

7. Agency Use Case: Managing Multi-Brand Sites

If you are a WordPress agency managing multiple client brands from a single multisite installation, multi-audience syncing is not optional—it is essential. Each client typically has their own Mailchimp account (or at least their own audience within a shared account), and you need each client’s forms to route data to the correct destination without any cross-contamination.

With Chimpmatic PRO, you can configure each form independently. Your “Client A – Contact Form” routes submissions to Client A’s Mailchimp audience using their API key, while “Client B – Newsletter” routes to a completely different account. There is no shared state between forms, which means zero risk of accidentally sending one client’s subscribers to another client’s list.

For agencies handling ten or more brands, this per-form isolation eliminates the need for complex custom code or third-party middleware like Zapier. It also reduces your monthly SaaS costs since the routing logic is built directly into the plugin. You configure it once per form, and it runs indefinitely without further maintenance.

Conclusion

Syncing Contact Form 7 to multiple Mailchimp audiences gives you ultimate flexibility in data management. While the Lite version of Chimpmatic handles simple one-to-one mapping perfectly, the PRO version unlocks the advanced routing and simultaneous syncing required by complex organizations.

Get The Power User Tool. Conditional logic, multi-sync actions, and advanced debugging. Chimpmatic PRO is the tool professional developers trust.

Posted on

Mailchimp Double Opt-in: WordPress Setup Guide (2026)

Short answer: Double Opt-in requires new subscribers to confirm their email address by clicking a link in an automated confirmation email before they are added to your Mailchimp Audience. Enable it in Mailchimp under Audience > Manage Audience > Settings > Form Settings. Chimpmatic automatically respects this setting — if Double Opt-in is on in Mailchimp, every Contact Form 7 submission triggers the confirmation email. The Pro version lets you override this per form.

Last updated: February 2026

What Is Double Opt-in (and Why Use It)?

Double Opt-in (DOI) is a two-step subscription process that verifies every email address before it enters your Mailchimp Audience:

  1. Step 1 — Signup: A visitor fills out your Contact Form 7 form on WordPress and submits it. Chimpmatic sends the subscriber data to the Mailchimp API.
  2. Step 2 — Confirmation: Instead of being added immediately, the subscriber receives an automated email from Mailchimp with a confirmation link. They click the link, and only then are they added to your Audience as a subscribed contact.

Until the subscriber clicks that link, they appear in your Audience with a “Pending” status. They are not counted as active subscribers and will not receive your campaigns.

Why Use Double Opt-in?

  • Validates email addresses. Every address on your list belongs to a real person who actively confirmed they want to receive your emails. Typos, fake addresses, and bot submissions are filtered out automatically.
  • Protects sender reputation. ISPs like Gmail, Outlook, and Yahoo track engagement metrics. A list of confirmed subscribers signals that your emails are wanted, which improves inbox placement and keeps you out of the spam folder.
  • Improves open and click rates. Because every subscriber chose to be there, engagement metrics are naturally higher than a Single Opt-in list that includes unverified addresses.
  • Reduces abuse complaints. Subscribers who confirmed their signup are far less likely to mark your emails as spam.
  • Creates an audit trail for compliance. You have two records: the form submission timestamp and the confirmation click timestamp. This is the strongest proof of consent for GDPR and other privacy regulations.

Single Opt-in vs. Double Opt-in

Mailchimp uses Single Opt-in by default for most accounts. If your primary contact address is in the EU, some Audiences may default to Double Opt-in. Here is how they compare:

Factor Single Opt-in Double Opt-in
How it works Subscriber is added immediately after form submission Subscriber must click a confirmation link in an email first
List growth speed Faster — no extra step Slower — some subscribers never confirm (10-30% drop-off)
List quality Lower — includes typos, bots, and fake addresses Higher — every address is verified and confirmed
Open / click rates Typically lower Typically higher (confirmed, engaged subscribers)
Abuse complaints Higher risk Lower risk
Sender reputation More vulnerable to bounces and spam reports Stronger — ISPs see a clean, engaged list
GDPR compliance Acceptable with documented proof of consent Gold standard — double proof of intent
CAN-SPAM / CCPA Compliant (requires unsubscribe mechanism) Compliant with stronger consent evidence
Best for High-volume lead generation, paid ads, instant downloads Newsletters, long-term lists, EU audiences, compliance-first

Bottom line: If list quality and deliverability matter more than raw growth speed, use Double Opt-in. If you are running paid campaigns where every conversion counts and you already filter bots with reCAPTCHA, Single Opt-in with good list hygiene can work.

How to Enable Double Opt-in in Mailchimp

This setting lives inside your Mailchimp Audience configuration. You must enable it in Mailchimp before anything changes on the WordPress side — Chimpmatic reads your Audience settings via the API and automatically respects whatever opt-in mode is active.

For an Existing Audience

  1. Log in to Mailchimp.
  2. Click Audience in the left menu, then Audience dashboard.
  3. If you have multiple Audiences, select the correct one from the dropdown.
  4. Click Manage Audience > Settings.
  5. Scroll to the Form Settings section and click Edit.
  6. Select Double Opt-in (or check the box to enable it, depending on your account version).
  7. Click Save opt-in setting.

Once saved, any new subscriber added through the API (including Chimpmatic submissions) will automatically receive the confirmation email instead of being added immediately.

For a New Audience

When creating a new Audience, check the box labeled “Enable double opt-in” during the setup wizard. This sets the default for all signup forms and API integrations connected to that Audience.

Note: Enabling Double Opt-in also automatically activates reCAPTCHA on your Mailchimp-hosted signup forms.

Managing Opt-in Settings in WordPress with Chimpmatic

Chimpmatic acts as a bridge between Contact Form 7 and the Mailchimp API. It does not have its own separate opt-in toggle in the Lite version — it reads your Audience settings and obeys them.

How It Works with Chimpmatic Lite (Free)

  • If Double Opt-in is enabled in Mailchimp → Chimpmatic sends subscribers with status: pending → Mailchimp sends the confirmation email → subscriber must click to become active.
  • If Double Opt-in is disabled in Mailchimp → Chimpmatic sends subscribers with status: subscribed → they are added immediately.

You do not need to configure anything in the Chimpmatic Lite tab beyond the standard API key, Audience, and field mapping setup.

The “Pending” Subscriber Issue

This is the most common support question: “My form is working, but I don’t see the subscriber in Mailchimp!”

If Double Opt-in is enabled, the subscriber exists in your Audience but with a “Pending” status. They will not appear in your main subscriber list until they click the confirmation link in their email. To verify:

  1. Go to Audience > All contacts in Mailchimp.
  2. Click Manage contacts > View non-subscribed contacts (or filter by status).
  3. Look for the email address — it should appear as “Pending.”

If the subscriber never confirms, they stay pending. Common reasons: the confirmation email landed in spam, the subscriber forgot, or they mistyped their email address (in which case the confirmation went to the wrong inbox).

For more troubleshooting, see Contact Form 7 Not Sending to Mailchimp? 7 Common Fixes.

Customizing the Confirmation Email

The confirmation email is the first thing a new subscriber sees from you. The default Mailchimp template is functional but generic — customizing it improves recognition and click-through rates.

  1. In Mailchimp, go to Audience > Signup forms > Form builder.
  2. Select “Opt-in confirmation email” from the dropdown at the top.
  3. Customize the following elements:
    • Subject line: Replace the default with something specific (e.g., “Confirm your subscription to [Your Brand]” or “One last step to get your free guide”).
    • Logo and branding: Add your logo so the email looks official, not like spam.
    • Body text: Explain what they signed up for and what to expect.
    • Confirmation button text: Change from “Confirm Subscription” to something more engaging (e.g., “Yes, I want in!”).
  4. Click Save.

You can also customize the Confirmation “Thank You” page and the optional Final Welcome Email (disabled by default) in the same Form builder dropdown. A well-designed sequence — confirmation email → thank you page → welcome email — creates a professional first impression.

Should You Enable the Final Welcome Email?

Mailchimp offers an optional “Final Welcome Email” that sends automatically after the subscriber confirms. It is disabled by default. Enable it when:

  • You want to deliver a lead magnet, coupon code, or onboarding link immediately after confirmation.
  • You want to set expectations (e.g., “You will receive our newsletter every Tuesday”).
  • You have a long delay before your first campaign and want to keep engagement warm.

Leave it disabled if you already have a Customer Journey or Classic Automation that triggers on “Subscribes to audience” — enabling both would send duplicate messages.

When to Use Single Opt-in Instead

Double Opt-in is not always the right choice. Consider Single Opt-in when:

  • You prioritize growth speed over list purity. If you are running paid ad campaigns and paying per click, losing 10-30% of signups to confirmation drop-off is a real cost. Every lead that fails to confirm is wasted ad spend.
  • You deliver content immediately. If the signup is for an instant download (ebook, checklist, template) and the delivery mechanism is the “Thank You” page or an immediate email, requiring a confirmation click first creates a frustrating user experience.
  • You already filter bots with reCAPTCHA. If your CF7 forms use Google reCAPTCHA v3, Cloudflare Turnstile, or similar bot protection, you are already filtering out most fake submissions. Double Opt-in as a spam filter becomes less necessary.
  • Your audience is non-EU and your compliance requirements are met. CAN-SPAM requires an unsubscribe mechanism but does not mandate Double Opt-in. If you are US-only and have clear consent language on your form, Single Opt-in is legally compliant.

Advanced: Per-Form Opt-in Override (Chimpmatic Pro)

Sometimes you need both strategies on the same site. For example: Double Opt-in for your newsletter form (clean list, long-term engagement) but Single Opt-in for a webinar registration form (the attendee needs the link immediately).

Chimpmatic Pro lets you override the Mailchimp Audience default on a per-form basis:

  1. Open your CF7 form in WordPress.
  2. Go to the ChimpMatic Pro tab.
  3. Find the Opt-in Settings section.
  4. Select “Force Single Opt-in” to bypass the Audience default for this form only.
  5. Save the form.

This gives you the best of both worlds: strict Double Opt-in for general forms that feed your main newsletter, and immediate Single Opt-in for high-intent landing pages where speed matters.

Need Per-Form Opt-in Control?

Feature Lite (Free) Pro
Respects Mailchimp DOI setting Yes Yes
Per-form opt-in override Yes
Mailchimp Tags Yes
Mailchimp Groups Yes
GDPR Consent Mapping Yes
Advanced Field Mapping Yes

See Pro Features & Pricing

GDPR and Legal Considerations

For businesses serving EU customers, Double Opt-in is not just a best practice — it is often the safest path to compliance. The General Data Protection Regulation (GDPR) mandates explicit, verifiable consent before sending marketing emails.

Why Double Opt-in Is the GDPR Gold Standard

Double Opt-in provides two verifiable records of consent:

  1. Form submission timestamp — when the subscriber entered their email address and clicked submit.
  2. Confirmation click timestamp — when the subscriber actively clicked the confirmation link in the email.

Together, these create an airtight audit trail. If a subscriber or regulator ever questions whether consent was given, you can point to both records as proof of informed, deliberate intent.

Other Privacy Laws

  • CAN-SPAM (US): Does not require Double Opt-in, but does require an unsubscribe mechanism and truthful sender information. Single Opt-in is compliant as long as you meet these requirements.
  • CASL (Canada): Requires express consent for commercial emails. Double Opt-in provides clear evidence of express consent.
  • CCPA (California): Focuses on data rights rather than email consent, but the trend toward stronger privacy protections means implementing DOI now future-proofs your strategy.

Even if you are not legally required to use Double Opt-in, the deliverability and list quality benefits make it worth considering for any serious email marketing program.

While Double Opt-in proves that a subscriber confirmed their address, GDPR also requires you to map consent checkboxes correctly so Mailchimp records what the subscriber consented to. For the full setup, see CF7 GDPR Consent Mapping Guide — that guide completes the compliance loop that Double Opt-in starts.

Troubleshooting Double Opt-in Issues

Problem Cause Fix
Subscriber stuck as “Pending” They have not clicked the confirmation link Check spam folder; resend confirmation; verify email address
Confirmation email never arrives Email landed in spam or was blocked Whitelist Mailchimp sending domain; check spam filters
Subscribers added immediately despite DOI DOI not enabled for this Audience Check Audience > Settings > Form Settings
Want DOI on some forms but not others Mailchimp DOI is a global Audience setting Use Chimpmatic Pro per-form override
Confirmation email looks generic Default template not customized Customize in Signup forms > Form builder

1. Subscriber Stuck as “Pending”

This is the expected behavior with Double Opt-in — the subscriber has not clicked the confirmation link yet. Check with the subscriber to see if the email landed in their spam or promotions folder. In Mailchimp, you can view pending contacts under Audience > All contacts by filtering for non-subscribed contacts. If the subscriber never confirms, they will remain pending indefinitely.

2. Confirmation Email Never Arrives

If the subscriber says they never received the confirmation email, the most common causes are:

  • The email landed in their spam or junk folder.
  • Their email provider blocked the message (common with strict corporate email filters).
  • They mistyped their email address on the form, so the confirmation went to the wrong inbox.

To troubleshoot: check the subscriber’s email address in Mailchimp for typos, ask them to whitelist Mailchimp’s sending domain, and if needed, follow the resend process below.

How to Resend the Confirmation Email

Mailchimp does not have a “resend confirmation” button. To trigger a fresh confirmation email for a pending subscriber:

  1. Go to Audience > All contacts and filter for non-subscribed/pending contacts.
  2. Find the subscriber and delete them from the Audience (this removes the pending record).
  3. Ask the subscriber to re-submit the form on your website.
  4. Chimpmatic will send the data to the API again, and Mailchimp will send a new confirmation email.

Before deleting, verify the email address is correct. If the subscriber mistyped their address, they will never receive the confirmation regardless of how many times it is sent.

3. Subscribers Added Immediately Despite DOI Being On

If subscribers are being added as “Subscribed” instead of “Pending,” Double Opt-in may not actually be enabled for this Audience. Go to Audience > Manage Audience > Settings > Form Settings > Edit and verify the opt-in setting. Also check whether a Chimpmatic Pro per-form override is forcing Single Opt-in on a specific form.

4. Want Double Opt-in on Some Forms but Not Others

Mailchimp’s Double Opt-in setting applies to the entire Audience — there is no way to set it per-form inside Mailchimp itself. The Chimpmatic Pro per-form override solves this by letting you force Single Opt-in on specific forms while keeping the Audience default as Double Opt-in.

5. Confirmation Email Looks Generic or Spammy

The default Mailchimp confirmation email is plain and unbranded. Subscribers may not recognize it and ignore or delete it. Go to Audience > Signup forms > Form builder, select “Opt-in confirmation email” from the dropdown, and customize the subject line, logo, body text, and button text. A branded, clear confirmation email significantly improves click-through rates.

Frequently Asked Questions

What is Double Opt-in in Mailchimp?

Double Opt-in is a two-step process where new subscribers must confirm their email address by clicking a link in a confirmation email before being added to your Mailchimp Audience. Until they confirm, they appear as “Pending” and do not receive campaigns.

How do I enable Double Opt-in in Mailchimp?

Go to Audience > Manage Audience > Settings > Form Settings > Edit, then select Double Opt-in and click “Save opt-in setting.” For new Audiences, check the “Enable double opt-in” box during creation.

Does Chimpmatic support Double Opt-in?

Yes. Chimpmatic Lite automatically respects your Mailchimp Audience setting. If Double Opt-in is enabled in Mailchimp, Chimpmatic sends subscribers with “pending” status, which triggers the confirmation email. Chimpmatic Pro adds per-form override to force Single or Double Opt-in on specific forms.

Why is my subscriber showing as “Pending” in Mailchimp?

Because Double Opt-in is enabled and the subscriber has not clicked the confirmation link in their email yet. Check if the email landed in their spam folder or if they mistyped their address. They will remain “Pending” until they confirm.

Can I use Double Opt-in on some forms and Single on others?

Not with Mailchimp alone — the opt-in setting is per-Audience, not per-form. However, Chimpmatic Pro lets you override the Audience default on each CF7 form individually.

Is Double Opt-in required by GDPR?

GDPR requires “explicit, verifiable consent” but does not specifically mandate Double Opt-in. However, DOI is widely considered the gold standard for EU audiences because it provides two timestamps of consent (form submission and confirmation click), creating the strongest possible audit trail. It is commonly used as a best practice for compliance, though your specific legal obligations depend on your jurisdiction and use case.

Does Double Opt-in hurt my list growth?

Yes, it reduces signups by roughly 10-30% because some subscribers never click the confirmation link. However, the subscribers who do confirm are higher quality — they are more engaged, less likely to report spam, and generate better deliverability metrics. The trade-off is a smaller but more valuable list.

How do I customize the Mailchimp confirmation email?

Go to Audience > Signup forms > Form builder, then select “Opt-in confirmation email” from the dropdown. You can customize the subject line, add your logo, change the body text, and modify the confirmation button. You can also customize the “Thank You” page and enable a Final Welcome Email in the same dropdown.

What happens if a subscriber never confirms?

They stay in your Audience with a “Pending” status indefinitely. They will not receive campaigns and do not count toward your active subscriber billing. You can delete pending contacts periodically to keep your Audience clean.

Why are my Contact Form 7 subscribers showing as “Pending” in Mailchimp?

Because Double Opt-in is enabled on your Mailchimp Audience. When Chimpmatic sends a subscriber via the API with DOI active, Mailchimp sets their status to “Pending” and sends a confirmation email. The subscriber must click the confirmation link before they become active. This is not a bug — it is the expected behavior. Check your Audience settings if you want to switch to Single Opt-in, or use Chimpmatic Pro to override it on specific forms.

Does Single Opt-in comply with CAN-SPAM?

Yes. CAN-SPAM requires an unsubscribe mechanism and truthful sender information but does not mandate Double Opt-in. Single Opt-in is fully compliant in the US as long as you include an unsubscribe link in every email.

Where can I find Mailchimp’s official Double Opt-in documentation?

Mailchimp maintains several help articles on this topic: About Double Opt-in, Single vs. Double Opt-in, and Choose Opt-in Settings. These cover the Mailchimp side. For the WordPress + CF7 integration side, you are in the right place.

Next Steps

Posted on

Contact Form 7 Mailchimp Automation: A 2026 Guide

Chimpmatic lets you trigger Mailchimp automations directly from Contact Form 7 submissions using tags. When someone fills out your CF7 form, Chimpmatic adds a tag to their Mailchimp profile, and Mailchimp’s Marketing Automation Flows (formerly Customer Journeys) detect that tag and launch a pre-built email sequence — welcome emails, lead magnet delivery, nurture series, or anything else you design. No code, no manual follow-up, no delay.

How CF7 + Mailchimp Automation Works

The automation chain has three links. WordPress handles the trigger, the Mailchimp API acts as the connector, and Mailchimp executes the action.

Stage Where What Happens
1. Trigger WordPress Visitor submits a CF7 form. Chimpmatic sends their email, name, and a tag (e.g., Ebook-Requested) to Mailchimp via the API.
2. Connector Mailchimp API Mailchimp receives the subscriber data and applies the tag to their profile. This happens in real time — typically under 2 seconds.
3. Action Mailchimp A Marketing Automation Flow detects the new tag and executes its sequence: send an email, wait 3 days, send another email, apply a new tag, and so on.

This is the same mechanism that Mailchimp’s own embedded forms use, except CF7 gives you full control over form design, field layout, spam protection, and conditional logic — and Chimpmatic handles the API connection behind the scenes.

Why Tag-Based Triggers Beat Generic Welcome Emails

The old approach was simple: someone joins your list, they get a welcome email. The problem is that everyone gets the same welcome email regardless of which form they filled out.

If your site has a newsletter signup, a contact form, an ebook download, a webinar registration, and a quote request — all feeding into one Mailchimp Audience — a generic welcome email makes no sense. The person who requested a quote needs a different follow-up than the person who downloaded an ebook.

Tags solve this. Each CF7 form applies a unique tag, and each tag triggers a different automation flow:

CF7 Form Chimpmatic Tag Mailchimp Automation
Newsletter signup Newsletter Welcome series (3 emails over 7 days)
Ebook download Ebook-Requested Deliver PDF + 2 follow-up tips
Webinar registration Webinar-Feb-2026 Confirmation + reminder + recording
Quote request Quote-Request Acknowledgment + sales follow-up
Contact form Contact-General Thank you + expected response time

One Audience, five forms, five completely different email sequences — all running automatically.

Step 1: Configure WordPress (Chimpmatic + CF7)

Before Mailchimp can trigger any automation, Chimpmatic needs to send the right tag when someone submits your form.

  1. Install and activate Chimpmatic (Lite or Pro) and Contact Form 7.
  2. Open the CF7 form you want to automate (or create a new one).
  3. Click the Chimpmatic tab in the form editor.
  4. Click Connect and Fetch Your Mailing Lists to load your Mailchimp Audiences.
  5. Select your Audience from the dropdown.
  6. Map your form fields to Mailchimp merge fields (EMAIL, FNAME, LNAME).
  7. In the Tags field, enter a unique tag name for this form — for example, Ebook-Requested.
  8. Click Save.

Important: The tag name you enter here must match the tag you select as the trigger in Mailchimp exactly. Mailchimp tags are case-insensitive, but avoid trailing spaces or special characters to prevent mismatches.

Chimpmatic Pro tip: Pro supports dynamic tagging — you can assign different tags based on dropdown selections, checkboxes, or radio buttons within the same form. This means a single “Contact Us” form can route to different automations depending on what the visitor selects.

Step 2: Build the Automation Flow in Mailchimp

Mailchimp’s automation system is now called Marketing Automation Flows (previously “Customer Journeys,” and before that, “Classic Automations”). Here is how to create a tag-triggered flow.

  1. Log in to Mailchimp and click Automations in the left sidebar.
  2. Click Build from scratch (or choose a pre-built template).
  3. Enter a flow name (e.g., “Ebook Delivery”) and select your Audience from the dropdown.
  4. Click Choose a trigger.
  5. Select Tag added from the trigger list.
  6. Choose the tag that matches what you configured in Chimpmatic (e.g., Ebook-Requested).
  7. Optionally, click Filter who can enter this flow to add segment conditions.
  8. Click Save Trigger.
  9. Click the + icon below the trigger to add your first action.
  10. Select Send email, then design your email (subject, content, PDF link, etc.).
  11. Add additional steps as needed: time delays, more emails, conditional splits, tag/untag actions.
  12. Click Continue, then Turn flow on.

Your automation is now live. Every time Chimpmatic applies the matching tag to a new subscriber (or an existing one), Mailchimp starts the flow.

Plan Requirements

Mailchimp Plan Triggers per Flow Steps per Flow Conditional Splits
Free 1 Limited No
Essentials 1 Up to 4 No
Standard Up to 3 Up to 200 Yes
Premium Up to 3 Up to 200 Yes

Most tag-triggered automations work on any paid plan. You only need Standard or higher if you want conditional splits, percentage splits, or multiple triggers on the same flow.

Tutorial: Lead Magnet Delivery Automation

This is the most common automation: someone downloads your ebook, checklist, or template, and Mailchimp delivers it instantly.

WordPress Side (Chimpmatic)

  1. Create a CF7 form with fields for Name and Email.
  2. In the Chimpmatic tab, connect your Audience and map fields.
  3. Set the tag to Ebook-Requested.
  4. Save the form and embed it on your landing page.

Mailchimp Side (Automation Flow)

  1. Create a new flow named “Ebook Delivery.”
  2. Set the trigger to Tag added → Ebook-Requested.
  3. Add a Send email action immediately (no delay).
  4. Design the email: subject line like “Here’s your [Ebook Name]”, include the download link prominently.
  5. Turn the flow on.

Test It

  1. Submit the form with a real email address.
  2. Check Mailchimp — the contact should appear with the Ebook-Requested tag.
  3. Check your inbox — the delivery email should arrive within 1–2 minutes.
  4. If you have Double Opt-in enabled, the subscriber must confirm first. The automation triggers after confirmation, not after form submission.

Tutorial: Multi-Step Nurture Sequence

A nurture sequence goes beyond delivering one email. It builds a relationship over days or weeks, guiding the subscriber from “just browsing” to “ready to buy.”

Day Email Purpose
0 Deliver requested content Fulfill the promise (ebook, checklist, template)
2 “Did you get a chance to read it?” Re-engage + share a bonus tip
5 Case study or success story Social proof + soft product mention
10 Direct offer or consultation invite Conversion opportunity
15 “Last chance” or move to newsletter Final push or graceful transition

How to Build This in Mailchimp

  1. Create the flow with Tag added as the trigger.
  2. Add the first Send email (Day 0 — content delivery).
  3. Add a Time delay of 2 days.
  4. Add the second Send email (Day 2 — follow-up).
  5. Continue adding delays and emails for each step in your sequence.
  6. Optionally, add a Conditional split (Standard plan) to check if the subscriber has already purchased. If yes, remove them from the nurture sequence. If no, continue.
  7. At the end, add a Tag action to apply Nurture-Complete so you can segment these contacts later.

The entire sequence runs automatically. You set it up once, and every new form submission triggers the full multi-step flow.

Advanced Workflows and Real-World Examples

The Webinar Registration Funnel

A webinar registration form applies the tag Webinar-Feb-2026. The Mailchimp flow sends:

  1. Immediately: Confirmation email with Zoom link and calendar invite.
  2. 2 hours before event: Reminder email. (Use a Specific date trigger or manual tag for this step.)
  3. 1 day after event: Recording + slides delivery.
  4. 3 days after event: Related product or service offer.

Pro tip: With Chimpmatic Pro’s dynamic tagging, you can include the webinar topic in the tag (e.g., Webinar-SEO vs Webinar-Email) and run completely different follow-up sequences for each topic.

The Support Ticket Router

A “Contact Us” form with a dropdown for Department (Sales / Support / Billing) uses Chimpmatic Pro’s dynamic tagging to apply different tags based on the selection:

Dropdown Selection Tag Applied Automation Action
Sales Inquiry-Sales Send product brochure + book a demo link
Support Inquiry-Support Send knowledge base links + ticket confirmation
Billing Inquiry-Billing Send billing portal link + account info

One form, three completely different automated responses — no manual sorting required.

The E-Commerce Upsell Engine

A post-purchase feedback form tags customers as Customer-Active. The flow waits 7 days, then sends a personalized upsell email with complementary products. If the customer buys again, a second tag (Repeat-Buyer) moves them into a VIP loyalty sequence with exclusive discounts.

Chimpmatic Lite vs Pro for Automations

Feature Lite (Free) Pro
Add subscribers to Mailchimp Yes Yes
Static tags (one tag per form) Yes Yes
Dynamic tags (based on form field values) No Yes
Multiple Audience sync No Yes
Per-form Double Opt-in override No Yes
Mailchimp Groups support No Yes
Conditional field mapping No Yes
Priority support No Yes

For automations specifically: Lite handles basic workflows perfectly — one form, one tag, one automation flow. Pro unlocks advanced scenarios where a single form needs to route subscribers to different automations based on their selections.

Compare plans and pricing →

Troubleshooting Automation Issues

Symptom Cause Fix
Tag applied but automation does not fire Tag name mismatch between Chimpmatic and Mailchimp flow trigger Compare the tag in Chimpmatic’s Tags field with the tag selected in your Mailchimp flow trigger. They must match exactly. Check for trailing spaces.
Subscriber shows as Pending, no automation email Double Opt-in is enabled and subscriber has not confirmed The tag is applied, but the automation waits until the subscriber confirms their email. Check their inbox (including spam) for the confirmation email. Learn more about DOI.
Form submits successfully but no email arrives Automation flow is paused or in Draft status Go to Mailchimp → Automations → find your flow. Check that its status is Active (not Draft or Paused). Click Turn flow on if needed.
Automation fires for new subscribers but not returning ones Flow is set to trigger only once per contact Edit the flow trigger settings and check the repeat/re-entry option. By default, flows only trigger once per contact per tag. Remove and re-add the tag to re-trigger, or create a separate flow.
Email arrives but hours late instead of immediately Time delay configured in the flow, or Mailchimp send throttling Open the flow and check for any Time delay steps between the trigger and the Send email action. Remove the delay if you want instant delivery. Mailchimp may also throttle sends on free plans.
Wrong automation email triggers for a form Tag mismatch — two forms sending the same tag, or wrong tag in Chimpmatic Open each CF7 form’s Chimpmatic tab and verify the tag is unique to that form. Each form should have its own tag that maps to its own flow.
Subscriber appears in Mailchimp but without the tag Tags field left empty in Chimpmatic settings Edit the CF7 form, go to the Chimpmatic tab, and check the Tags field. If it is blank, enter your tag name and save. Re-submit the form to test.

Tag Mismatch Fix

Open the CF7 form in WordPress, click the Chimpmatic tab, and copy the exact tag text. In Mailchimp, edit your flow trigger and paste the same text. Mailchimp tags are case-insensitive (ebook-requested and Ebook-Requested match), but trailing spaces or special characters will prevent matching. Delete and re-type the tag in both places if you are unsure.

Double Opt-in Pending Fix

When Double Opt-in is enabled, Chimpmatic sends subscribers with pending status. The tag is applied to their profile, but the automation flow will not trigger until they click the confirmation link in their email. Check the subscriber’s status in Mailchimp: if it says Pending, they have not confirmed yet. Ask them to check their spam folder. Once they confirm, the automation fires automatically.

Flow Not Active Fix

Go to Mailchimp → Automations. Find your flow in the list. If its status shows Draft or Paused, it will not send any emails. Click the flow name, then click Turn flow on (or Resume for paused flows). You can check the flow’s activity log to see if contacts have entered but emails were held.

Repeat Trigger Fix

By default, Mailchimp Marketing Automation Flows trigger only once per contact for a given tag. If a returning subscriber re-submits the form, they already have the tag, so the flow does not restart. To re-trigger: remove the tag from the contact first (manually or via an automation), then re-add it. Alternatively, create a time-based re-entry flow.

Delayed Email Fix

Open your flow in Mailchimp and check every step between the trigger and the Send email action. If there is a Time delay step (even a 1-hour delay), that explains the wait. Remove it for instant delivery. Also check Mailchimp’s email delivery documentation — free plans may experience send throttling during high-volume periods.

Wrong Email Trigger Fix

When two CF7 forms accidentally share the same tag, both forms trigger the same automation. Open each form’s Chimpmatic tab and verify each tag is unique. Rename tags to be descriptive: Newsletter-Signup, Ebook-SEO-Guide, Webinar-Feb-2026 — not generic names like Tag1 or Subscriber.

Missing Tag Fix

If a subscriber appears in your Mailchimp Audience but without the expected tag, the Tags field in Chimpmatic was likely left blank. Edit the CF7 form, click the Chimpmatic tab, and enter your tag name in the Tags field. Save the form and test with a new submission. Existing subscribers who were added without tags will not be retroactively tagged — you will need to manually tag them in Mailchimp or have them re-submit the form.

FAQ

How do I trigger a Mailchimp automation from Contact Form 7?

Install the Chimpmatic plugin, open your CF7 form, go to the Chimpmatic tab, connect your Mailchimp Audience, and enter a tag in the Tags field. In Mailchimp, create a Marketing Automation Flow with “Tag added” as the trigger and select the same tag. Every form submission now triggers the automation automatically.

What are Mailchimp Marketing Automation Flows?

Marketing Automation Flows (formerly called Customer Journeys, and before that, Classic Automations) are Mailchimp’s current automation system. They let you build multi-step email sequences triggered by events like tag additions, signups, purchases, or dates. Classic Automations were retired in June 2025 and replaced by this system.

Can I run multiple automations from one Mailchimp Audience?

Yes. You can create unlimited automation flows within a single Audience. Each flow listens for a different trigger (usually a different tag), so you can run dozens of independent automations — one Audience, many workflows. Mailchimp recommends this approach over maintaining multiple Audiences. See our guide on merging Audiences.

Does Chimpmatic support dynamic tags based on form fields?

Chimpmatic Lite supports one static tag per form. Chimpmatic Pro supports dynamic tagging — you can assign different tags based on dropdown selections, checkboxes, or radio buttons within the same form. This lets a single form route to multiple different automations.

Will automations trigger if Double Opt-in is enabled?

Yes, but with a delay. When Double Opt-in is active, the subscriber enters Mailchimp with pending status and the tag is applied to their profile. However, the automation flow does not fire until the subscriber clicks the confirmation link and their status changes to subscribed. See the Double Opt-in setup guide for details.

What happens if a subscriber already exists in Mailchimp?

If someone submits a CF7 form and their email already exists in your Audience, Chimpmatic updates their profile with any new data and adds the new tag. If the tag is new to that contact, the automation flow triggers normally. If the contact already has that tag, the flow will not re-trigger unless you remove and re-add the tag.

Can I send different emails based on dropdown selections in CF7?

Yes, with Chimpmatic Pro. Use dynamic tagging to assign different tags based on the selected dropdown value. Create a separate Mailchimp flow for each tag. When a visitor selects “Sales” they get a sales follow-up; when they select “Support” they get a support response — all from the same form.

Which Mailchimp plan do I need for tag-based automations?

Any paid Mailchimp plan (Essentials, Standard, or Premium) supports tag-triggered automation flows. The free plan has limited automation capabilities. Standard and Premium plans add conditional splits, percentage splits, and up to 3 triggers per flow.

How do I test my automation before going live?

Submit your CF7 form using a real email address you control. Check Mailchimp to confirm the subscriber appears with the correct tag. Verify the automation flow status is Active. Check your inbox for the automated email. If using Double Opt-in, confirm the subscription first, then check for the automation email.

What replaced Mailchimp Classic Automations?

Mailchimp retired Classic Automations on June 1, 2025. They were replaced by Marketing Automation Flows (previously called Customer Journeys). All existing classic automations were archived. If you still have classic automations, migrate them to flows using Mailchimp’s conversion tool. The tag-based trigger system works the same way in the new system.

Why is my Mailchimp automation not triggering?

The five most common causes: (1) Tag mismatch between Chimpmatic and the flow trigger. (2) The flow is in Draft or Paused status. (3) Double Opt-in is enabled and the subscriber has not confirmed. (4) The subscriber already has the tag from a previous submission. (5) The Tags field in Chimpmatic is blank. See the troubleshooting section above for detailed fixes for each scenario.

Can I use Contact Form 7 with Mailchimp without a plugin?

Technically, you could write custom PHP to call the Mailchimp API directly from CF7’s wpcf7_mail_sent hook. But this requires managing API authentication, error handling, tag logic, field mapping, and Double Opt-in status yourself. Chimpmatic handles all of this with a visual interface — no code required.

Why Contact Form 7 + Chimpmatic Beats Embedded Mailchimp Forms

Feature Embedded Mailchimp Form CF7 + Chimpmatic
Form styling Generic Mailchimp design, hard to customize Inherits your WordPress theme CSS
Field flexibility Limited to Mailchimp’s field types Conditional fields, file uploads, multi-step forms
Spam protection Basic reCAPTCHA reCAPTCHA, Turnstile, Akismet, honeypots
Tag control Groups only (visible to subscriber) Background tags (invisible to subscriber)
Multiple actions Subscribe only Subscribe + send CF7 email + third-party integrations
Automation trigger “Signs up” trigger only Tag-based triggers (unlimited automations per form)

Next Steps

Posted on

How to Tag Contact Form 7 Subscribers in Mailchimp (2026 Guide)

Chimpmatic lets you automatically tag Contact Form 7 subscribers in Mailchimp the moment they submit a form. Enter a tag name in the Chimpmatic tab of your CF7 form, and every submission adds that tag to the subscriber’s Mailchimp profile — no code, no manual sorting. With Chimpmatic Pro, you can assign different tags based on dropdown selections, checkboxes, or radio buttons within the same form.

Last updated: February 2026

What Are Mailchimp Tags?

Tags are internal labels you attach to contacts in your Mailchimp Audience. Unlike groups (which subscribers can see and choose on signup forms), tags are invisible to your contacts. Only you and your team see them.

Tags let you categorize subscribers by source, behavior, interest, or any other criteria without creating separate Audiences. When Chimpmatic sends a form submission to Mailchimp, it can include one or more tags that are automatically applied to the subscriber’s profile.

Common tag use cases:

  • Source tracking: Source:Website, Source:Landing-Page, Source:Webinar
  • Interest tracking: Interest:SEO, Interest:Email-Marketing, Interest:Ads
  • Lead scoring: Lead:Hot, Lead:Cold, Lead:Qualified
  • Automation triggers: Ebook-Requested, Quote-Request, Webinar-Feb-2026

Tags vs. Groups vs. Segments

Mailchimp offers three ways to organize contacts. They serve different purposes and are not interchangeable.

Feature Tags Groups Segments
Visibility Internal only (contacts cannot see them) Can be shown on signup forms Internal only (filter results)
Who assigns them You, your team, or integrations (like Chimpmatic) Subscribers choose from predefined options Mailchimp auto-assigns based on conditions
Persistence Static — stays until manually removed Static — stays until subscriber changes preference Dynamic — updates automatically as conditions change
Trigger automations Yes (“Tag added” trigger) Yes (“Joins group” trigger) No (segments are filters, not triggers)
API support Full — add/remove via POST /lists/{id}/members/{hash}/tags Limited — set via member interest categories No direct API — Mailchimp computes dynamically
Chimpmatic support Lite: static tags. Pro: static + dynamic tags Pro only N/A (managed in Mailchimp)
Best for Internal categorization, automation triggers, source tracking Subscriber preferences, interest selection Campaign targeting, engagement filtering

Rule of thumb: Use tags for anything the subscriber should not see (source, lead score, internal status). Use groups for anything the subscriber should choose (newsletter preferences, content topics). Use segments to combine tags, groups, and engagement data into targetable audiences for campaigns.

Static Tagging: One Tag Per Form (Lite + Pro)

Static tagging is the simplest approach. Every subscriber who submits a specific CF7 form receives the same tag. If you have five forms, each one applies a different tag.

CF7 Form Tag Applied Purpose
Newsletter signup Newsletter Identify newsletter subscribers
Contact form Contact-General Track general inquiries
Ebook download Ebook-SEO-Guide Trigger lead magnet delivery
Quote request Quote-Request Route to sales follow-up
Webinar registration Webinar-Feb-2026 Trigger webinar confirmation sequence

Static tagging is available in both Chimpmatic Lite (free) and Pro. You can apply multiple static tags to the same form by entering them comma-separated in the Tags field (e.g., Newsletter, Source:Website).

Dynamic Tagging: Tags Based on Form Fields (Pro)

Dynamic tagging is a Chimpmatic Pro feature that assigns different tags based on what the subscriber selects in the form. Instead of every submission getting the same tag, the tag changes depending on dropdown values, checkbox selections, or radio button choices.

Example: Contact Form with Department Routing

Your CF7 form has a dropdown field [select department "Sales" "Support" "Billing"]. With dynamic tagging, Chimpmatic maps each option to a different tag:

Dropdown Selection Tag Applied Automation Triggered
Sales Inquiry-Sales Send product brochure + demo link
Support Inquiry-Support Send knowledge base links
Billing Inquiry-Billing Send billing portal link

One form, three completely different tags and automations. Without dynamic tagging, you would need three separate CF7 forms to achieve the same result.

Example: Interest-Based Tagging with Checkboxes

Your CF7 form has checkboxes for interests: [checkbox interests "SEO" "Email Marketing" "Social Media" "PPC"]. With dynamic tagging, each checked option adds its own tag. A subscriber who checks “SEO” and “PPC” gets both Interest:SEO and Interest:PPC applied to their Mailchimp profile.

Step-by-Step Setup

Static Tag Setup (Lite + Pro)

  1. Install and activate Chimpmatic (Lite or Pro) and Contact Form 7.
  2. Go to Contact → Contact Forms in WordPress and open the form you want to tag.
  3. Click the Chimpmatic tab in the form editor.
  4. Click Connect and Fetch Your Mailing Lists to load your Audiences.
  5. Select your Audience from the dropdown.
  6. Map your form fields to Mailchimp merge fields (EMAIL, FNAME, LNAME).
  7. In the Tags field, enter your tag name. For multiple tags, separate with commas: Newsletter, Source:Website.
  8. Click Save.

Every form submission now sends the subscriber to Mailchimp with the specified tag(s) applied automatically.

Dynamic Tag Setup (Pro Only)

  1. Open the CF7 form and click the Chimpmatic tab.
  2. Connect your Audience and map your fields (same as static setup).
  3. In the Tags field, use the CF7 mail-tag that corresponds to your dropdown, checkbox, or radio button field. For example: [department].
  4. Chimpmatic Pro resolves the mail-tag at submission time and applies the subscriber’s actual selection as the tag.
  5. Click Save.

Important: The tag that gets applied is the raw value from the form field. If your dropdown options are “Sales”, “Support”, “Billing” — those exact strings become the Mailchimp tags. Plan your form field values with this in mind.

Using Tags to Trigger Automations

Tags are the bridge between CF7 form submissions and Mailchimp automations. The flow works like this:

  1. Subscriber fills out your CF7 form.
  2. Chimpmatic sends their data to Mailchimp and applies the tag (e.g., Ebook-Requested).
  3. A Marketing Automation Flow in Mailchimp has “Tag added” as its trigger, listening for Ebook-Requested.
  4. Mailchimp detects the new tag and starts the automation: send email, wait, send another email, etc.

This is the mechanism behind every automated workflow — welcome sequences, lead magnet delivery, nurture campaigns, webinar reminders. For the full setup, see the CF7 Mailchimp Automation Guide.

Tags vs. “Signs Up” Trigger

Mailchimp also offers a “Signs up for email” automation trigger. The difference:

Trigger When It Fires Best For
Signs up for email Any new subscriber joins the Audience One generic welcome email for all new contacts
Tag added A specific tag is applied to a contact Per-form automations, targeted sequences, routing

If you have multiple forms feeding into one Audience, always use tag-based triggers. The “Signs up” trigger fires for every new subscriber regardless of which form they came from.

How Tags Work with Existing Subscribers

What happens when someone who is already in your Mailchimp Audience submits another CF7 form?

  • Chimpmatic does not create a duplicate. It finds the existing contact by email address and updates their profile.
  • The new tag is appended. If the subscriber already has tags Newsletter and Source:Website, and the new form applies Quote-Request, they now have all three tags.
  • Existing tags are never removed. Chimpmatic only adds tags — it never strips existing ones. To remove a tag, do it manually in Mailchimp or via an automation flow’s “Untag” action.
  • The automation triggers normally. If the Quote-Request tag is new for this contact, any “Tag added” automation listening for it will fire.

This means subscribers can accumulate tags over time as they interact with different forms on your site — building a richer profile with every interaction.

Tag Naming Conventions and Best Practices

Use a Prefix System

As your tag list grows, finding the right tag becomes difficult. A prefix system keeps tags alphabetically sorted and filterable in Mailchimp:

Prefix Purpose Examples
Source: Where the subscriber came from Source:Website, Source:Landing-Page, Source:Webinar
Interest: What topics they care about Interest:SEO, Interest:Email, Interest:Ads
Status: Where they are in the funnel Status:Lead, Status:Customer, Status:VIP
Form: Which CF7 form they submitted Form:Contact, Form:Quote, Form:Newsletter
Campaign: Which marketing campaign drove them Campaign:BF2026, Campaign:Spring-Sale

Tag Naming Rules

  • Keep names short and descriptive. Ebook-SEO-Guide is better than Downloaded_the_SEO_Guide_from_the_Website.
  • Use hyphens, not spaces. While Mailchimp allows spaces in tag names, hyphens are safer across integrations and avoid trailing-space mismatches.
  • Be consistent with casing. Mailchimp tags are case-insensitive for matching (Newsletter and newsletter are the same tag), but consistent casing makes your tag list readable.
  • Avoid generic names. Tag1, New, or Test become meaningless within weeks. Use descriptive names from day one.

Audit Your Tags Quarterly

Tags accumulate fast. Every quarter, review your Mailchimp tag list:

  1. Go to Audience → Manage Audience → Tags.
  2. Sort by contact count. Tags with 0 contacts are candidates for deletion.
  3. Look for near-duplicates (Newsletter vs newsletter-signup vs Newsletter-Signup).
  4. Merge similar tags by adding the canonical tag to affected contacts and removing the old one.
  5. Delete unused tags to keep the list clean.

Chimpmatic Lite vs. Pro for Tagging

Feature Lite (Free) Pro
Static tags (same tag for every submission) Yes Yes
Multiple static tags (comma-separated) Yes Yes
Dynamic tags (based on form field values) No Yes
Tags from dropdown selections No Yes
Tags from checkbox selections No Yes
Tags from radio button selections No Yes
Mailchimp Groups support No Yes
Multiple Audience sync No Yes
Per-form Double Opt-in override No Yes
Priority support No Yes

For tagging specifically: If every form needs just one fixed tag, Lite does the job perfectly. If you need a single form to apply different tags based on what the subscriber selects, you need Pro.

Compare plans and pricing →

Troubleshooting Tag Issues

Symptom Cause Fix
Subscriber appears in Mailchimp but without the tag Tags field left empty in Chimpmatic settings Edit the CF7 form, go to the Chimpmatic tab, enter the tag name, and save
Wrong tag applied to subscriber Tag name mismatch or wrong form linked Verify the tag in the Chimpmatic tab matches your intended tag exactly
Tag applied but automation does not fire Tag name mismatch between Chimpmatic and Mailchimp flow trigger Compare tags character by character; check for trailing spaces
Dynamic tags not working (shows mail-tag literal) Using Chimpmatic Lite (dynamic tags require Pro) Upgrade to Pro, or switch to static tags
Duplicate tags appearing in Mailchimp Inconsistent naming across forms Standardize tag names; merge duplicates in Mailchimp
Subscriber is Pending and tag seems missing Double Opt-in is enabled; tag is applied but hidden until confirmation Tag is there — check after subscriber confirms. See DOI guide

Missing Tag Fix

Open the CF7 form in WordPress, click the Chimpmatic tab, and check the Tags field. If it is blank, enter your tag name and save. Subscribers added before the tag was configured will not be retroactively tagged — you need to manually tag them in Mailchimp or have them re-submit the form.

Wrong Tag Fix

If subscribers are getting the wrong tag, check two things: (1) Make sure you are editing the correct CF7 form — if you have multiple forms, each one has its own Chimpmatic tab with its own tag setting. (2) Check the tag text for typos. Copy the tag from the Chimpmatic tab and paste it into Mailchimp’s tag search to verify they match.

Tag Exists but Automation Does Not Fire

The tag name in Chimpmatic and the tag selected in your Mailchimp automation flow trigger must match exactly. Mailchimp tags are case-insensitive (Newsletter and newsletter match), but trailing spaces or invisible characters will prevent matching. Delete and re-type the tag in both places. Also verify the automation flow status is Active, not Draft or Paused.

Dynamic Tags Not Working

If the Tags field contains a mail-tag like [department] and Mailchimp shows the literal text “[department]” as the tag instead of the actual value, you are using Chimpmatic Lite. Dynamic tag resolution (replacing mail-tags with form field values) is a Pro-only feature. Either upgrade to Pro or switch to static tags.

Duplicate Tags Fix

If you see similar tags like Newsletter, newsletter-signup, and Newsletter Signup in your Mailchimp Audience, they were created by different forms with inconsistent naming. To fix: choose one canonical tag name, add it to all affected contacts, remove the old tags, and update all CF7 forms to use the canonical name. Follow the naming conventions section to prevent this going forward.

Pending Subscriber Tag Fix

When Double Opt-in is enabled, Chimpmatic still applies the tag to the subscriber’s profile at submission time. However, the subscriber’s status is Pending until they confirm. The tag is there — but automation flows with a “Tag added” trigger may not fire until the subscriber’s status changes to Subscribed. This is expected Mailchimp behavior, not a bug.

FAQ

How do I tag Contact Form 7 subscribers in Mailchimp?

Install the Chimpmatic plugin, open your CF7 form, click the Chimpmatic tab, connect your Mailchimp Audience, and enter a tag name in the Tags field. Every form submission now applies that tag to the subscriber’s Mailchimp profile automatically.

What is the difference between Mailchimp tags and groups?

Tags are internal labels invisible to subscribers — you use them for categorization, tracking, and automation triggers. Groups are subscriber-facing options that can appear on signup forms as checkboxes or dropdowns. Use tags for anything the subscriber should not see; use groups for anything they should choose.

Can I add multiple tags to one form?

Yes. Enter multiple tag names separated by commas in the Chimpmatic Tags field. For example: Newsletter, Source:Website, Interest:Email. All three tags will be applied to every subscriber who submits that form.

Can I assign different tags based on dropdown selections?

Yes, with Chimpmatic Pro. Use the CF7 mail-tag for your dropdown field (e.g., [department]) in the Tags field. Pro resolves the mail-tag at submission time and applies the subscriber’s actual selection as the tag. Lite does not support this.

Are Mailchimp tags case-sensitive?

No. Mailchimp treats Newsletter and newsletter as the same tag when matching. However, the display name preserves the casing of the first version created. For consistency, always use the same casing across all your forms.

Do tags trigger Mailchimp automations?

Yes. Mailchimp Marketing Automation Flows support a “Tag added” trigger. When Chimpmatic applies a tag to a subscriber, any flow listening for that tag fires automatically. See the Automation Guide for the full setup.

What happens to tags when a subscriber already exists?

Chimpmatic appends new tags to the existing subscriber profile without removing any current tags. The contact keeps all previously applied tags plus the new ones from the latest form submission.

How do I remove a tag from a subscriber?

Chimpmatic only adds tags — it does not remove them. To remove a tag, go to the subscriber’s profile in Mailchimp and delete the tag manually. You can also use a Mailchimp automation flow’s “Untag” action to remove tags automatically as part of a workflow.

Why are my tags not appearing in Mailchimp?

Three common causes: (1) The Tags field in the Chimpmatic tab is empty — enter a tag name and save. (2) You are using Chimpmatic Lite with a mail-tag like [department] — dynamic tags require Pro. (3) The subscriber has not been added yet — submit a test form and check Mailchimp.

Can I use tags to send campaigns to specific subscribers?

Yes. When creating a campaign in Mailchimp, you can target subscribers by tag. Go to the recipient selection step and choose “Tag” as a segment condition. You can combine multiple tag conditions (e.g., contacts tagged Source:Website AND Interest:SEO) for precise targeting.

Is there a limit on how many tags I can use?

Mailchimp does not impose a hard limit on the number of tags per Audience or per contact. However, for practical management, keep your tag list under 50 active tags and follow a naming convention to stay organized.

How do I see which tags a subscriber has?

In Mailchimp, go to Audience → All contacts, click on a subscriber’s email address to open their profile, and scroll to the Tags section. You will see every tag currently applied to that contact.

Next Steps

Posted on

Chimpmatic vs MC4WP: Which Mailchimp Plugin Is Best for CF7? (2026)

TL;DR: Executive Summary

Choosing between Chimpmatic and MC4WP comes down to your existing workflow. If you strictly use Contact Form 7, Chimpmatic is the superior choice because it integrates natively into the CF7 editor, requires zero shortcodes, and offers advanced features like “Interest Group” mapping directly within the form builder. MC4WP is a better general-purpose option if you need to create standalone forms without Contact Form 7 or integrate with multiple different form plugins simultaneously.

When building a WordPress site, connecting your contact forms to your email marketing platform is a critical step. For years, developers have relied on Contact Form 7 (CF7) for its flexibility and Mailchimp for its marketing power. However, bridging these two giants requires a reliable connector plugin.

Enter the two heavyweights of the industry: MC4WP (Mailchimp for WordPress) and Chimpmatic Lite. While both plugins share the same ultimate goal—getting subscriber data from WordPress into Mailchimp—their approaches are fundamentally different.

In this comprehensive Chimpmatic vs. MC4WP comparison, we will dissect both plugins to help you decide which one deserves a spot in your tech stack. We’ll analyze their ease of use, feature sets, performance impact, and pricing models.

Quick Comparison: Feature Breakdown

Feature Chimpmatic MC4WP
Primary Integration Native Contact Form 7 Tab Separate Settings Page
Setup Speed Fast (No Shortcodes needed) Moderate (Requires linking)
Field Mapping Real-time visual mapping Manual field code entry
Tags Support Yes (Native & Dynamic) Yes (Requires Add-on/Premium)
Bloat Factor Lightweight (Runs only on CF7) Heavier (Standalone Builder)

1. Integration Philosophy: Native vs. Standalone

The biggest difference between Chimpmatic vs. MC4WP lies in where they live within your WordPress dashboard. This might seem like a cosmetic detail, but it fundamentally changes your development workflow.

Chimpmatic: The “Native” Approach

Chimpmatic was built specifically for Contact Form 7. It doesn’t try to be a form builder itself. Instead, it adds a dedicated “Mailchimp” tab directly inside the Contact Form 7 editor. This means when you are editing a contact form, you can configure the Mailchimp settings for that specific form without ever leaving the page.

There is no need to copy-paste shortcodes or navigate to a separate “Mailchimp” menu item in the WordPress sidebar. The integration feels like it is part of Contact Form 7 core. This “native” approach reduces context switching and keeps your workflow streamlined.

MC4WP: The “Hub” Approach

MC4WP takes a different route. It creates its own top-level menu item in the WordPress admin. It acts as a central hub for all things Mailchimp. While it integrates with Contact Form 7, it treats CF7 as just one of many “integrations.”

To set it up, you often have to go to the MC4WP settings, configure your API key, enable the Contact Form 7 integration, and then sometimes use specific shortcodes or field names to ensure data passes through correctly. It is a powerful system, but it feels like a layer on top of your forms rather than a part of them.

2. Field Mapping and Ease of Use

Field mapping is the process of connecting a field in your form (e.g., [text* your-name]) to a merge field in Mailchimp (e.g., FNAME). If this process is clunky, you will waste hours debugging missing data.

The Chimpmatic Mapping Experience

Chimpmatic shines here. Because it lives inside the CF7 editor, it can see your form tags. It offers a visual mapping interface. You simply select your Mailchimp audience from a dropdown, and Chimpmatic automatically fetches the available fields from that audience.

You then see a list of your Mailchimp fields (First Name, Last Name, Birthday, etc.) next to dropdowns containing your Contact Form 7 fields. You just match them up. There is no need to memorize field names or worry about capitalization errors. It validates the connection in real-time.

Turbocharge Your Workflow: Stop wasting time with manual field codes. Get visual, drag-and-drop style mapping with Chimpmatic PRO.

The MC4WP Mapping Experience

MC4WP relies heavily on you matching the name attributes of your HTML inputs to the field tags in Mailchimp. For example, if your Mailchimp field is FNAME, MC4WP often expects your CF7 field to be named mc4wp-FNAME or requires you to configure specific integration settings to bridge the gap.

While experienced developers get used to this naming convention, it is a common stumbling block for beginners. If you make a typo in the field name, the data simply vanishes silently, leading to frustrating troubleshooting sessions.

3. Advanced Features: Tags, Groups, and Compliance

Modern email marketing isn’t just about collecting emails; it’s about segmentation. You want to know who these people are and what they are interested in.

Handling Mailchimp Tags

Chimpmatic treats Tags as a first-class citizen. In the same tab where you map fields, you can type in static tags (e.g., “Website Lead”, “Contact Page”) that will be applied to every submission from that form.

With Chimpmatic PRO, this goes a step further with Dynamic Tagging. You can set up logic so that if a user selects “Support” from a dropdown menu, they get the “Support-Ticket” tag in Mailchimp. If they select “Sales,” they get the “Sales-Lead” tag. This granular control is essential for automation workflows.

Interest Groups

Mailchimp’s “Interest Groups” are powerful but notoriously difficult to map in WordPress plugins. Chimpmatic fetches your groups (like “News Preferences” or “Event Types”) and allows you to map them to checkboxes or radio buttons in your CF7 form. This gives your users direct control over their subscription preferences.

GDPR Compliance

Both plugins offer GDPR solutions, but the implementation differs. MC4WP includes a specific “Agree to terms” checkbox feature. Chimpmatic allows you to map a standard Contact Form 7 acceptance checkbox to the GDPR marketing permissions field in Mailchimp, ensuring your audit trail is accurate.

4. Performance and “Bloat”

WordPress performance is a ranking factor, so adding heavy plugins is never ideal. In the battle of Chimpmatic vs. MC4WP, architecture matters.

  • Chimpmatic: Is extremely lightweight. It loads its assets primarily on the backend when you are editing a form. On the frontend, it hooks into the Contact Form 7 submission process. It doesn’t load separate CSS or JS files on every page load unless specifically required for a widget, keeping your site speed high.
  • MC4WP: Is a comprehensive suite. It includes a form builder, checkbox integrations for comments/registration forms, and extensive logging. While it is well-coded, it is naturally “heavier” because it is trying to do more things. If you ONLY need to connect CF7, MC4WP is technically overkill.

5. Pricing Comparison

Both plugins offer free versions in the WordPress repository, but serious businesses will eventually look at the Premium/Pro upgrades for support and advanced features.

Chimpmatic Pricing

  • Lite Version: Free (Unlimited forms, basic mapping).
  • PRO Version: Starts at ~$59/year. Includes multi-audience syncing, conditional logic, premium support, and dynamic tagging.

MC4WP Pricing

  • Free Version: Robust but limited integrations.
  • Premium: Starts at ~$59/year. Includes multiple forms, advanced ecommerce integration, and reporting.

The pricing is competitive, so the decision shouldn’t be based on cost, but on value per feature for your specific use case.

6. The Verdict: Which One Should You Choose?

After analyzing both plugins extensively, here is our final recommendation for 2026.

Choose Chimpmatic If:

  • You strictly use Contact Form 7.
  • You want a clean admin interface without extra sidebars.
  • You need visual field mapping without touching code.
  • You rely heavily on Tags and Interest Groups for segmentation.

Choose MC4WP If:

  • You need a standalone form builder (no CF7).
  • You use multiple form plugins (e.g., Gravity Forms + CF7).
  • You need deep integration with WooCommerce checkout (standard feature).

Final Thoughts

For the dedicated Contact Form 7 user, Chimpmatic offers a more streamlined, “WordPress-native” experience. It removes the friction between creating a form and capturing a lead. It respects the environment it lives in (the CF7 editor) rather than trying to take over your dashboard.

However, MC4WP remains a formidable powerhouse for generalist users who need a “Swiss Army Knife” for Mailchimp across various parts of their site.

Ultimately, the best plugin is the one that fits your workflow. But if you value speed, simplicity, and deep integration, Chimpmatic is the tool that will save you hours of setup time.

Ready to Simplify Your Mailchimp Integration? Stop wrestling with shortcodes and start growing your list. Upgrade to Chimpmatic PRO today for the ultimate Contact Form 7 experience.

Posted on

Contact Form 7 Not Sending to Mailchimp? 7 Common Fixes (2026 Guide)

If your Contact Form 7 form submits successfully but subscribers never appear in Mailchimp, the problem is almost always a configuration mismatch — not a bug. The most common causes are a required merge field in Mailchimp that your form does not include, an expired API key, or Double Opt-in marking subscribers as “Pending” instead of active. Enable the Chimpmatic Debug Logger to see the exact Mailchimp API error message, then follow the fix for your specific error below.

Last updated: February 2026

Quick Fix Checklist

Run through this checklist before diving into detailed fixes. Most issues resolve at step 1 or 2.

# Check How Details
1 Required fields match Mailchimp → Audience → Settings → Audience fields Every field marked “Required” in Mailchimp must be mapped in Chimpmatic
2 Check for Pending subscribers Mailchimp → Audience → filter by “Non-subscribed” Double Opt-in makes subscribers appear as Pending, not Subscribed
3 API key is valid Mailchimp → Account → Extras → API keys Key should show “Active” status; regenerate if unsure
4 Field types match Compare CF7 field types with Mailchimp merge field types Sending text to a Number or Date field causes a silent rejection
5 Opt-in checkbox exists and is checked Test the form yourself — check the box If using a GDPR acceptance checkbox, unchecked = no subscription
6 Server allows outgoing connections Check with your host or test with wp_remote_get Some hosts block outgoing cURL to api.mailchimp.com
7 No caching conflicts Disable page caching plugins temporarily Full-page caching can cache the form nonce and break submissions

Still stuck? Enable the Debug Logger to see the exact error message from Mailchimp’s API.

Fix 1: Required Merge Field Mismatch (Most Common)

This is the number one cause of “CF7 not sending to Mailchimp.” Mailchimp lets you mark merge fields as Required. If your CF7 form does not include a mapped field for every required merge field, Mailchimp silently rejects the submission with a 400 Bad Request error.

The Problem

Your Mailchimp Audience has FNAME (First Name) marked as Required. Your CF7 form only collects an email address. When Chimpmatic sends the data to Mailchimp, the API responds: "FNAME must be provided - Please enter a value". The subscriber is never added.

How to Fix It

  1. Log in to Mailchimp.
  2. Go to Audience → Settings → Audience fields and |MERGE| tags.
  3. Review every field. Look for fields marked as Required.
  4. For each Required field, either:
    • Add the field to your CF7 form and map it in the Chimpmatic tab, OR
    • Uncheck “Required” in Mailchimp if you don’t need that field
  5. Save changes in Mailchimp.
  6. Test the form again.

Tip: The only truly required field in Mailchimp is EMAIL. All other merge fields (FNAME, LNAME, PHONE, ADDRESS, BIRTHDAY) can safely be set to optional unless you have a specific business reason to require them.

Fix 2: Double Opt-in “Pending” State

If subscribers are reaching Mailchimp but appear under “Non-subscribed” or “Pending” instead of “Subscribed,” your integration is working correctly — Double Opt-in is enabled.

The Problem

When Double Opt-in is active, Chimpmatic sends subscribers with pending status. Mailchimp sends a confirmation email. Until the subscriber clicks the confirmation link, they remain Pending and do not appear in the default “Subscribed” view.

How to Check

  1. Go to Audience → All contacts.
  2. Click the status dropdown (defaults to “Subscribed”).
  3. Select “Non-subscribed” or “Pending”.
  4. Look for your test submission.

If the subscriber is there with Pending status, your integration is working. The subscriber just hasn’t confirmed yet.

How to Fix It

  • If you want DOI: Ask the subscriber to check their inbox (including spam) for the confirmation email. See the DOI troubleshooting guide for resend instructions.
  • If you want Single Opt-in: Go to Audience → Manage Audience → Settings → Form Settings → Edit and disable Double Opt-in.
  • If you want mixed: Use Chimpmatic Pro‘s per-form override to force Single Opt-in on specific forms while keeping DOI as the Audience default.

Fix 3: Invalid or Expired API Key

If the API key in Chimpmatic is invalid, expired, or belongs to a different Mailchimp account, every submission will fail silently.

How to Check

  1. Log in to Mailchimp.
  2. Go to Account → Extras → API keys.
  3. Verify the key listed in Chimpmatic matches an active key in this list.
  4. Check the key’s status — it should say Active.

How to Fix It

  1. If the key is missing or inactive, click Create A Key in Mailchimp.
  2. Copy the new key.
  3. In WordPress, go to Contact → Chimpmatic (or the Chimpmatic tab in your form).
  4. Paste the new API key and save.
  5. Click Connect and Fetch Your Mailing Lists to verify the connection.
  6. Re-map your Audience and fields if prompted.

Common mistake: Copying the key with a trailing space. Mailchimp API keys end with a data center suffix like -us21. Make sure you copy the full key without extra spaces before or after.

For the full API key setup, see the How to Get Your Mailchimp API Key guide.

Fix 4: Field Data Type Mismatch

Mailchimp merge fields have types: Text, Number, Date, Phone, Address, Birthday, Website. If you send data that doesn’t match the expected type, Mailchimp rejects the entire submission.

Common Mismatches

Mailchimp Field Type Wrong Input Correct Input
Number Twenty-Five (text) 25
Date Jan 1st, 1990 01/01/1990 (MM/DD/YYYY)
Birthday 1990-03-15 03/15 (MM/DD only)
Phone call me at five five five 555-123-4567
Address Single text field Structured: addr1, city, state, zip, country

How to Fix It

  1. Go to Audience → Settings → Audience fields and |MERGE| tags in Mailchimp.
  2. Note the type of each field you are mapping.
  3. In your CF7 form, use the matching input type:
    • [number your-age] for Number fields
    • [date your-birthday] for Date fields
    • [tel your-phone] for Phone fields
  4. Test the form with valid data matching each field type.

For detailed field mapping, see the Mailchimp Audience Fields and Merge Tags guide. For birthday fields specifically, see Sending Birthday Fields to Mailchimp.

Fix 5: Opt-in Checkbox Not Checked

If your CF7 form includes a GDPR acceptance checkbox linked to Chimpmatic, the subscriber is only sent to Mailchimp when the checkbox is checked. If it’s unchecked, the form submits successfully (the CF7 email notification still sends), but no data goes to Mailchimp.

This is intentional. GDPR compliance requires explicit consent, and an unchecked box means the visitor did not consent to marketing emails.

How to Check

  1. Open your CF7 form and look for an [acceptance] field.
  2. Test the form with the checkbox checked.
  3. Verify the subscriber appears in Mailchimp.
  4. Test again with the checkbox unchecked.
  5. Verify the subscriber does NOT appear — this confirms the consent logic is working.

If the checkbox is always unchecked by default and you want it pre-checked, edit the CF7 tag to include default:on: [acceptance your-consent default:on]. However, be aware that pre-checked consent boxes may not comply with GDPR in the EU. See the GDPR Consent Guide for details.

Fix 6: Server or Firewall Blocking

Some hosting providers block outgoing HTTP requests from your WordPress server to external APIs. If your host’s firewall blocks connections to api.mailchimp.com, Chimpmatic cannot send data to Mailchimp.

Symptoms

  • The Debug Logger shows a connection error, timeout, or cURL error 7: Failed to connect.
  • The Chimpmatic tab cannot fetch your mailing lists when you click “Connect.”
  • Other WordPress plugins that call external APIs (Akismet, Jetpack, WooCommerce) also fail.

How to Fix It

  1. Contact your hosting provider and ask them to whitelist outgoing connections to *.api.mailchimp.com on port 443 (HTTPS).
  2. If your host uses a shared IP that has been blacklisted by Mailchimp’s firewall (Akamai), ask your host to provide a dedicated outgoing IP or route API traffic through a different IP.
  3. Check if a WordPress security plugin (Wordfence, NinjaFirewall, Sucuri) is blocking outgoing requests. Temporarily disable firewall plugins and test.
  4. Verify your server’s cURL version is 7.35 or higher and supports TLS 1.2. Ask your host to update if needed.

Quick Test

Add this to a temporary PHP file or run via WP-CLI to test connectivity:

$response = wp_remote_get( 'https://us21.api.mailchimp.com/3.0/' );
echo wp_remote_retrieve_response_code( $response );
// Should return 401 (unauthorized) — that means the connection works
// If it returns nothing or an error, the connection is blocked

Fix 7: Caching or Plugin Conflicts

Full-page caching plugins can interfere with CF7 form submissions in several ways:

  • Cached nonces: WordPress security nonces expire after 12-24 hours. If a cached page serves a stale nonce, the form submission may be rejected.
  • Cached form HTML: Some caching plugins cache the entire form output, which can prevent dynamic Chimpmatic fields from loading.
  • JavaScript minification conflicts: Aggressive JS minification or deferring can break CF7’s AJAX submission, which means Chimpmatic’s hooks never fire.

How to Fix It

  1. Exclude the form page from your caching plugin’s cache. Most caching plugins (WP Super Cache, W3 Total Cache, WP Rocket, LiteSpeed Cache) have a URL exclusion list.
  2. Disable JavaScript minification temporarily and test. If the form works, add CF7’s JavaScript files to the minification exclusion list.
  3. Test in a clean environment: Temporarily disable all plugins except CF7 and Chimpmatic. If the form works, re-enable plugins one by one to find the conflict.

How to Use the Debug Logger

The Debug Logger is the single most important troubleshooting tool. It shows you the exact request Chimpmatic sends to Mailchimp and the exact response Mailchimp returns — including the error message.

Step-by-Step

  1. Open your CF7 form in WordPress (Contact → Contact Forms).
  2. Click the Chimpmatic tab.
  3. Enable the Debug Logger toggle.
  4. Save the form.
  5. Submit a test entry through the form on your site.
  6. Go to WordPress → Tools → Site Health → Debug Log, or check /wp-content/debug.log directly.
  7. Search for [Chimpmatic] entries.

Reading the Debug Output

The log entry will show:

  • The request: What data Chimpmatic sent to Mailchimp (email, merge fields, tags, status).
  • The response: What Mailchimp returned — either success (200) or an error code with a detailed message.

Example error entries and what they mean:

Log Entry Meaning Fix
400: FNAME must be provided First Name is required in Mailchimp but not mapped Fix 1
400: Your merge fields were invalid A field value doesn’t match the expected type Fix 4
400: looks fake or invalid Mailchimp rejected the email address format Subscriber entered an invalid email
400: is already a list member Subscriber already exists (not an error — profile is updated) Expected behavior, no fix needed
401: API key is invalid API key is expired, revoked, or incorrect Fix 3
403: Forbidden API key doesn’t have permission for this Audience Generate a new full-access API key
cURL error 7: Failed to connect Server cannot reach api.mailchimp.com Fix 6
cURL error 28: Connection timed out Connection to Mailchimp timed out Fix 6

Important: Disable the Debug Logger after troubleshooting. Leaving it enabled writes to the log on every form submission, which can grow the log file unnecessarily on high-traffic sites.

Mailchimp API Error Reference

These are the most common Mailchimp API errors you will encounter with CF7 integrations:

HTTP Code Error Title Common Cause Resolution
400 Bad Request Invalid data sent (missing required fields, wrong format) Check merge field mapping and data types
400 Invalid Resource Merge field value doesn’t match expected type Match CF7 field types to Mailchimp field types
400 Member Exists Contact already in Audience (Chimpmatic handles this gracefully) Not an error — profile is updated with new data
401 Unauthorized API key is invalid, expired, or from wrong account Generate a new API key in Mailchimp
403 Forbidden API key lacks permission for the requested Audience Create a new API key with full access
404 Resource Not Found Audience ID has changed or been deleted Re-fetch mailing lists in Chimpmatic and re-select the Audience
429 Too Many Requests API rate limit exceeded (10 concurrent connections) Wait and retry; this is rare for form submissions
500 Internal Server Error Mailchimp’s servers are having issues Wait and retry; check status.mailchimp.com
503 Service Unavailable Mailchimp is temporarily down or your IP is rate-limited Wait and retry; contact host if persistent

Troubleshooting Decision Table

Use this table to match your symptom to the correct fix:

Symptom Most Likely Cause Fix
Form submits but subscriber never appears in Mailchimp Required field mismatch or API key issue Fix 1Fix 3Debug Logger
Subscriber appears as “Pending” instead of “Subscribed” Double Opt-in is enabled Fix 2
Some form fields don’t appear in Mailchimp profile Fields not mapped in Chimpmatic tab Open Chimpmatic tab, map missing fields to merge tags
Chimpmatic cannot fetch mailing lists Invalid API key or server blocking Fix 3Fix 6
Debug log shows 400 errors Data validation failure Error Reference → match the error title
Debug log shows cURL error Network/firewall issue Fix 6
Form works with checkbox checked but not unchecked Consent logic working correctly Fix 5 — this is intentional
Form worked before but suddenly stopped API key revoked, Audience deleted, or plugin update Fix 3 → re-fetch lists → re-map fields
Tags not appearing on subscriber profile Tags field empty or using Lite with dynamic tags See Tagging Guide

FAQ

Why is Contact Form 7 not sending to Mailchimp?

The most common causes are: (1) A merge field marked as “Required” in Mailchimp that your CF7 form does not include. (2) An expired or invalid API key. (3) Double Opt-in marking subscribers as “Pending” instead of active. Enable the Debug Logger to see the exact API error message.

How do I check if CF7 is connecting to Mailchimp?

Open your CF7 form, click the Chimpmatic tab, and click “Connect and Fetch Your Mailing Lists.” If Audiences load successfully, the connection is working. If it fails, check your API key and server connectivity.

Why do subscribers show as “Pending” in Mailchimp?

Because Double Opt-in is enabled on your Audience. Subscribers must click the confirmation link in their email before their status changes from Pending to Subscribed. This is expected behavior, not a bug.

What does “FNAME must be provided” mean?

The First Name (FNAME) merge field is marked as Required in your Mailchimp Audience settings. Either add a First Name field to your CF7 form and map it in the Chimpmatic tab, or go to Mailchimp and uncheck “Required” for the FNAME field.

How do I enable the Chimpmatic Debug Logger?

Open your CF7 form in WordPress, click the Chimpmatic tab, and toggle the Debug Logger on. Save the form, submit a test entry, then check /wp-content/debug.log for entries containing [Chimpmatic]. Disable the logger after troubleshooting.

Why did my Mailchimp integration suddenly stop working?

Common causes: (1) Your API key was regenerated or revoked in Mailchimp. (2) The Audience was deleted or renamed. (3) A WordPress or plugin update changed how CF7 processes form data. Re-enter your API key, re-fetch mailing lists, and re-map your fields.

Does Chimpmatic handle duplicate subscribers?

Yes. If a subscriber already exists in your Audience, Chimpmatic updates their profile with any new data (name, phone, tags) instead of creating a duplicate. The Mailchimp API may return a 400: Member Exists response, which Chimpmatic handles gracefully.

Can a caching plugin break Mailchimp integration?

Yes. Full-page caching can cache stale form nonces, and aggressive JavaScript minification can break CF7’s AJAX submission handler. Exclude your form pages from the cache and test.

How do I test if my server can reach Mailchimp?

Use WP-CLI or a temporary PHP snippet to run wp_remote_get('https://us21.api.mailchimp.com/3.0/'). If it returns a 401 status code, the connection works (401 means “unauthorized” because you didn’t send an API key, but the connection succeeded). If it returns nothing or an error, your server is blocking outgoing connections.

What Mailchimp API errors should I look for in the debug log?

The most common are 400: FNAME must be provided (required field missing), 400: Your merge fields were invalid (data type mismatch), 401: API key is invalid (expired key), and cURL error 7: Failed to connect (firewall blocking). See the full error reference above.

My form has no errors in the debug log but subscribers still don’t appear. Why?

If the debug log shows a successful 200 response, the subscriber was added to Mailchimp. Check for: (1) Pending status due to Double Opt-in — filter by “Non-subscribed” in Mailchimp. (2) Wrong Audience selected — you may be checking a different Audience than the one Chimpmatic is sending to. (3) Browser caching — hard-refresh the Mailchimp Audience page.

Can I use Contact Form 7 with Mailchimp without Chimpmatic?

Technically, yes — you could write custom PHP to call the Mailchimp API from CF7’s wpcf7_mail_sent hook. But you would need to handle API authentication, error handling, field mapping, tag logic, and Double Opt-in status yourself. Chimpmatic handles all of this with a visual interface and no code required.

Next Steps

Posted on

Connect Contact Form 7 with Mailchimp

Chimpmatic is a free WordPress plugin that connects Contact Form 7 to Mailchimp. It syncs form submissions directly to your Mailchimp Audience, maps fields to merge tags, and manages subscribers — no code required. Trusted by over 50,000 WordPress sites.

This 2026 CF7 Mailchimp integration guide walks you through the full Chimpmatic setup in under five minutes using the free Lite version, then covers advanced features like Mailchimp Tags, Mailchimp Groups, and GDPR Compliance available in the Pro upgrade. If you are brand-new to CF7, start with the basic setup guide first, then come back here.

Short answer: Install the free Chimpmatic plugin, paste your Mailchimp API key into the ChimpMatic Lite tab on your CF7 form, select your Audience, map the Email field, and save. The full process takes under five minutes. The detailed walkthrough follows below.

Last updated: February 2026

Prerequisites & Requirements

Before you begin, make sure the foundation is solid. Most integration issues come from missing one of these basics:

  • A working WordPress site with administrative access to the dashboard.
  • Contact Form 7 installed and activated — your form should already be sending email. If you haven’t built a form yet, use the basic Contact Form 7 setup tutorial first.
  • A Mailchimp account (Free or Paid) with at least one Audience (list) created.
  • The Chimpmatic plugin installed and activated — available free on WordPress.org.
  • Your Mailchimp API key (API v3) ready to use. If you do not have one yet, follow the step-by-step guide: How to get your Mailchimp API key.

Language note: this guide uses “Audience” because that is Mailchimp’s official term for lists inside the Marketing Platform. When you see “Audience ID,” it refers to the unique identifier tied to a specific list you select inside the plugin’s Integration Settings.

Step-by-Step Setup: Connect Contact Form 7 to Mailchimp (2026)

Follow these steps in order. Each step is small, but together they ensure clean data, correct field mapping, and consistent subscriber behavior.

  1. Step 1: Generate Your Mailchimp API Key

    The first step is authentication. You need an API key — a secure token that lets the plugin communicate with the Mailchimp Marketing Platform without requiring your account password. All traffic flows directly between your server and Mailchimp’s API v3 endpoints. The key is stored encrypted in your WordPress database and never shared with third parties.

    If you don’t have one yet, follow our detailed guide: How to get your Mailchimp API key. If you manage multiple accounts, verify you are using the key for the correct one — the API key controls which Audiences load.

  2. Step 2: Create or Verify Your CF7 Form

    Open Contact Form 7 in WordPress and confirm your form is already sending email. If it is not, fix that first. The plugin does not replace CF7’s email functionality — it adds subscriber sync to Mailchimp on top of it.

    Inside the Form tab, you should see mail-tags for each input. The default example includes fields like name, email, subject, and message. Your exact fields may differ, but the key is having at least one email field because Mailchimp requires it:

    [text* your-name], [email* your-email], [text your-subject] & [textarea your-message]

    If you need a quick sanity check, submit the form once and confirm you receive the notification email. The screenshot below shows how a typical form configuration looks within the CF7 interface:

    Form

  3. Step 3: Connect to Your Mailchimp Account

    Navigate to your CF7 form and open the “ChimpMatic Lite” tab. This tab is added automatically when the plugin is activated. Paste your Mailchimp API key into the designated field and click the Connect and Fetch Your Mailing Lists button. This triggers a real-time query to the API to retrieve your Audience IDs and available merge fields.

    If you are running multiple forms, you can configure each one separately. Each form has its own integration settings, so you can map different fields or use different Audiences per form.

    Tip: keep your form names descriptive. When you return later, it is easier to understand which form maps to which Audience — especially if you use different sources such as “Contact,” “Newsletter,” or “Ebook Download.”

  4. Step 4: Select the Correct Mailchimp Audience

    After you connect, you will see a dropdown list of Audiences. Choose the one where new subscribers should be stored. Double-check that you have selected the correct Audience, especially if your account has multiple lists — a common mistake is connecting successfully but routing subscribers to the wrong one.

    If you are unsure which Audience is correct, open Mailchimp in another tab and compare the Audience name and unique ID.

  5. Step 5: Map CF7 Mail-Tags to Mailchimp Fields

    This is where the connection comes together. In the ChimpMatic Lite tab, you will see dropdown menus for each required and optional Mailchimp field. You must map “Subscriber Email” (the *EMAIL* merge tag) to your form’s email tag — usually [your-email]. You can also map “Subscriber Name” (*FNAME*) to your name field.

    This is the translation layer between what your form captures and what Mailchimp stores:

    ChimpMatic Lite API Key

    Here you need to input your Mailchimp API key, and hit the button to fetch your lists:
    Find your Mailchimp API here
    Once you have fetched your lists, they will be ALL here. Now, you can choose a list that will store your subscribers information for this this specific form:

    Hit the Connect button to load your lists Learn More
    Only [email-tags] will be displayed here as options:

    MUST be an email tag Learn More
    You can leave this off or choose the mail-tag for NAME:

    This may be sent as Name Learn More
    If you need to add more fields, click on "Advanced Settings" and activate "Custom Fields":

  6. Step 6: Save and Perform a Live Test

    Click Save at the bottom of the page. Then go to your website, fill out the form with a real email address, and submit. Within seconds, you should see the new subscriber appear in your Mailchimp dashboard under the selected Audience.

    If you have Double Opt-in enabled, the subscriber will be marked as “pending” until they confirm via email. This is normal behavior and can be required for GDPR compliance.

    Check the subscriber record and confirm the mapped fields (name, email) are populated correctly. If a field is blank, adjust the mapping and test again. This quick verification prevents weeks of collecting incomplete data.

Understanding Field Mapping & Merge Tags

Field mapping is the process of telling WordPress which piece of information goes into which slot in Mailchimp. CF7 uses mail-tags like [your-email] or [your-name]. Mailchimp uses fields called merge tags — the most common are EMAIL, FNAME (First Name), and LNAME (Last Name).

Required Fields

Mailchimp requires an email address for every subscriber. The Email field is marked as required in the integration. Always map this to your CF7 email mail-tag (usually [your-email]). If you do not, submissions will fail silently or generate errors.

Standard Fields

If your form includes a name field, map it to FNAME. If you have a last name field, map it to LNAME. If you do not collect a certain field, leave that Mailchimp field unmapped. Do not force a value unless it makes sense for your Audience data.

Custom Fields

Mailchimp allows custom merge fields for data like company name, phone number, or birthday. Create the custom merge field in Mailchimp first, then enable Advanced Settings in the Pro version and map the corresponding CF7 mail-tag. This keeps your data structured and usable for segmentation and automation.

One common mistake is a data type mismatch. If you have a “Birthday” field in Mailchimp set to a specific date format but your CF7 form uses a plain text field, the integration may fail. Always ensure that field types in your form match the field types in your Marketing Platform settings.

Mail-Tags vs. Merge Tags

CF7 mail-tags are defined by the inputs inside your form. For example, a CF7 field like “Company” might create a mail-tag such as [your-company]. Mailchimp merge tags are defined in your Audience settings. Mapping connects the two. If you change a mail-tag in CF7, you must update the mapping to match, or the data will not flow.

Why Mapping Matters

Good mapping leads to clean Audience data, which enables segmentation, automation, and reporting. For example, if you map a “Company” field to a custom merge tag, you can later build automations or segments based on company size. If you map incorrectly, you end up with data in the wrong field, which makes segmentation unreliable.

Advanced: Tags, Groups, and GDPR Consent

The Lite version covers the core integration workflow. If you need advanced audience segmentation or compliance features, the Pro upgrade adds tools for tags, groups, and consent. You can upgrade when those needs appear.

Mailchimp Tags

Tags are the simplest way to segment subscribers. They are internal labels used by you to organize your Audience — subscribers never see them. You might tag by campaign source (eBook, webinar, newsletter) or by intent (pricing, demo, trial).

With the Pro version, you can apply tags automatically when a CF7 form is submitted. Practical example: if you have a “Free Guide” form and a “Contact Sales” form, you can apply tags like “guide” and “sales” to keep those audiences separate inside a single list. This makes automations and reporting far easier than managing multiple Audiences.

Mailchimp Groups

Groups are Mailchimp’s built-in preference management system. Unlike tags, groups are typically subscriber-facing — they allow subscribers to self-select interests such as “News,” “Product Updates,” or “Events.” With Pro, you can map CF7 checkbox or select fields directly to Mailchimp Groups. This is ideal if you want to offer subscription preferences at sign-up.

A clean group structure avoids duplicate subscribers and keeps compliance easier to manage. Use the dedicated guide for details: How to use Mailchimp Groups.

GDPR Consent and Double Opt-in

If your audience includes EU residents, GDPR compliance is not optional. Mailchimp supports GDPR fields and consent recording, and the Pro version can map CF7 consent checkboxes to Mailchimp’s marketing permissions fields. This lets you store proof of consent inside the Marketing Platform. For a full walkthrough, see: Collect consent with GDPR.

Double Opt-in is another best practice. When enabled, Mailchimp sends a confirmation email before activating a subscriber. This reduces fake sign-ups and improves deliverability. Even if you are not legally required to use it, Double Opt-in filters out invalid or mistyped addresses and builds a more engaged list over time.

Ready for Tags, Groups, and GDPR?

Feature Lite (Free) Pro
API Key Connection Yes Yes
Audience Selection Yes Yes
Email + Name Mapping Yes Yes
Custom Field Mapping Yes
Mailchimp Tags Yes
Mailchimp Groups Yes
GDPR Consent Yes
Priority Support Yes

See Pro Features & Pricing

Troubleshooting: Contact Form 7 Mailchimp Not Working

If your Contact Form 7 Mailchimp integration is not working and subscribers are not appearing, don’t panic. 99% of issues trace back to a configuration error. Enable the Debug Logger inside the ChimpMatic tab and click SAVE before testing — the log will record the exact API response and tell you precisely why a submission was rejected.

Problem Most Likely Cause Quick Fix
Invalid API Key error Extra spaces or billing suspension Regenerate key, re-paste, reconnect
Lists don’t load Zero Audiences in Mailchimp Create at least one Audience first
Subscribers show “Pending” Double Opt-in is enabled Normal — subscriber must confirm via email
Submission rejected Required field not mapped Map all required fields or make optional in Mailchimp
Email field error Email not mapped to CF7 tag Map Email to [your-email]
Wrong Audience Incorrect Audience selected Reselect correct Audience ID and save
Nothing happens Expired key or cleaned subscriber Check Debug Logger for exact error
Marked as spam Akismet/CF7 spam filter Check Akismet settings, whitelist if legitimate
Plugin conflict Caching or security plugin blocking API Temporarily disable and test, then allowlist

1. Invalid API Key Errors

If you see a red error message about an “Invalid API Key,” check for extra spaces at the beginning or end of the key. Also ensure your Mailchimp account doesn’t have billing issues that might have suspended API access. Regenerate the key in Mailchimp if needed, then click Connect and Fetch Your Mailing Lists again.

2. API Key Connects but Lists Do Not Load

Confirm your API key is valid and not restricted. Also check that your Mailchimp account has at least one Audience created. An account with zero Audiences will connect successfully but show an empty dropdown.

3. Subscribers Appear as “Pending”

This is expected when Double Opt-in is enabled in your Mailchimp Audience settings. Ask the subscriber to check their inbox (and spam folder) for the confirmation email. If they never confirm, their status stays pending.

4. Required Field Mismatch

If you have a field marked as “Required” in Mailchimp (like Phone Number) but you haven’t mapped it or included it in your CF7 form, Mailchimp will reject the entire submission. Either make the field optional in Mailchimp or add it to your form and map it.

5. Email Field Not Mapped

Mailchimp requires an email address. If the Email field is not mapped to a valid CF7 mail-tag, the request will fail. Reopen the ChimpMatic Lite tab and map the Email field to [your-email] or your custom email tag.

6. Data Going to the Wrong Audience

If subscribers show up in the wrong list, the Audience selector was set incorrectly. Open the settings tab, choose the correct Audience ID, save, and test again.

7. Form Submits but Nothing Happens in Mailchimp

Check the Debug Logger output. Common causes include an expired API key, a field mapping that references a deleted merge tag, or Mailchimp rejecting the request because the subscriber email already exists with a “cleaned” or “unsubscribed” status. The log will show the exact error code and message from the API.

8. Akismet or Spam Filtering

If CF7 marks a submission as spam (orange border), it will not trigger the integration. This is a safety feature to prevent your Mailchimp account from being flooded with bot data. Check your Akismet settings or CF7 spam filters if legitimate submissions are being blocked.

9. Conflicts with Caching or Security Plugins

Some security plugins block outbound API requests or modify form submissions. Temporarily disable caching or firewall rules and test again. If it works, add an allowlist rule for Mailchimp API requests. If your production server is behind a firewall, confirm it can reach the Mailchimp API endpoints.

Frequently Asked Questions

Do I need the Pro version to connect CF7 to Mailchimp?

No. The free Lite version handles the core connection — API setup, list selection, and field mapping. Pro is only needed for advanced segmentation features like tags, groups, and GDPR consent mapping.

Which Mailchimp API version does the plugin use?

It uses the Mailchimp API v3, the current API for the Marketing Platform. Your API key must be generated under the API v3 keys section in your Mailchimp account.

Can I connect multiple CF7 forms to different Audiences?

Yes. Each CF7 form has its own integration settings. You can connect multiple forms to different Audiences by selecting the correct Audience ID in each form.

Does this plugin replace CF7 email notifications?

No. The plugin only handles the Mailchimp sync. CF7 continues to send email notifications as usual — you can manage those settings in the Mail tab.

Is my Mailchimp API key safe?

Yes. The key is encrypted within your WordPress database. It is never shared with third parties or sent to external servers. All communication happens directly between your server and Mailchimp’s API v3 endpoints.

What happens if a subscriber is already on the list?

The plugin will update the existing subscriber’s profile with any new information provided in the form fields — ensuring your Audience data stays current without creating duplicates.

How do I add custom fields to the Mailchimp integration?

Create the custom merge field in Mailchimp first (Audience > Settings > Merge Fields), then enable Advanced Settings in the Pro version and map the corresponding CF7 mail-tag. This keeps your data structured and usable for segmentation.

How do I comply with GDPR using Contact Form 7 and Mailchimp?

Use a consent checkbox in your CF7 form, enable GDPR fields in Mailchimp, and map that checkbox using the Pro version. This records consent inside the Marketing Platform. Follow the full guide: Collect consent with GDPR.

Can I tag subscribers automatically from a CF7 form?

Yes. The Pro version can apply Mailchimp Tags at submission time. This is the simplest way to segment subscribers by source or campaign without managing multiple lists.

How is Chimpmatic different from MC4WP (Mailchimp for WordPress)?

MC4WP is a standalone form builder with its own form system. Chimpmatic takes a different approach — it integrates directly with Contact Form 7, the most popular WordPress form plugin. If you already use CF7 and want to keep your existing forms, Chimpmatic connects them to Mailchimp without replacing your form setup. You get field mapping, tags, groups, and GDPR support while keeping the CF7 workflow you already know.

Is the Contact Form 7 Mailchimp integration free?

Yes. The Chimpmatic Lite plugin is completely free and handles the full integration — API connection, Audience selection, and field mapping. The Pro version adds optional features like Mailchimp Tags, Groups, and GDPR consent mapping.

How long does it take to set up CF7 with Mailchimp?

About 5 minutes. The setup involves pasting your Mailchimp API key, selecting your Audience, mapping the email field, and saving. No coding or developer help is needed.

Does Contact Form 7 work with Mailchimp without a plugin?

No. Contact Form 7 has no built-in Mailchimp integration. You need a connector plugin like Chimpmatic to bridge CF7 form submissions to the Mailchimp API. Without it, you would need custom PHP code to make API calls on every form submission.

Why is Contact Form 7 Mailchimp not working?

The most common causes are an invalid or expired API key, the Email field not being mapped to a CF7 mail-tag, or Double Opt-in marking subscribers as “pending” instead of active. Enable the Debug Logger for the exact error message. See the full troubleshooting section above for 9 specific fixes.

Why are my Mailchimp Tags not appearing?

Tag synchronization is a Pro feature. The free Lite version focuses on core list integration and basic field mapping.

Next Steps

Still have questions? Get in touch — we’re happy to help.

Posted on

How to Get Your Mailchimp API Key

Every other guide on the internet makes you click through 5 menus to find your Mailchimp API key. Here’s the shortcut: admin.mailchimp.com/account/api/ — log in, click that link, done. Your API keys are right there. No hunting, no screenshots of outdated dashboards, no 20-step walkthroughs.

If you need to connect WordPress and Contact Form 7 to Mailchimp using Chimpmatic, the API key is the only thing standing between you and a fully automated email list. This guide covers how to get it, how to secure it, and what to do when things go wrong.

Get Your Mailchimp API Key in One Click

Open this link while logged into Mailchimp:

https://admin.mailchimp.com/account/api/

That takes you straight to the API keys page under Extras > API Keys. You’ll see a dashboard like this:

Mailchimp API keys dashboard showing Extras menu, existing keys with labels, and Create A Key button

From here you can view existing keys, create new ones, or revoke old ones. If you don’t have a key yet, click “Create A Key” at the bottom of the list. Mailchimp generates a new API v3 key instantly.

Your key looks like this: 5998xxxxxxxxxxxxxxxxxxxx-us4. The suffix after the dash (-us4) identifies your Mailchimp data center — don’t cut it off when you copy.

Why You Need an API Key for WordPress

An API key lets WordPress and Mailchimp communicate securely without sharing your account password. It’s a one-way pass: WordPress can push subscriber data into your Mailchimp audience, but the key alone can’t access your billing or account settings.

If you’re using Contact Form 7, your forms only send emails by default. They don’t store contacts, don’t segment users, and don’t trigger automation. With Chimpmatic and an API key, every form submission pushes the subscriber’s name, email, and any custom fields directly into your Mailchimp audience — tagged, segmented, and ready for your next campaign.

Without this connection, you’re copying contacts from your inbox into Mailchimp by hand. That’s slow, error-prone, and doesn’t scale.

Step-by-Step: The Manual Navigation Path

If the direct link doesn’t work (corporate SSO, multiple accounts), here’s the manual path:

  1. Log in to Mailchimp with Admin or Manager permissions. Standard and Viewer accounts cannot create API keys.
  2. Click your account name in the top-right corner, then select “Account & billing”.
  3. Open the Extras dropdown in the top navigation bar and select “API keys”.
  4. Click “Create A Key” at the bottom of the Your API Keys section.
  5. Copy the full key including the data center suffix (e.g., -us4).
  6. Add a label like “Chimpmatic Pro – Live Site” so you know what it’s for later.

Paste the key into your Chimpmatic settings in WordPress and you’re connected.

Security Best Practices

Your API key has read and write access to your entire subscriber list. If someone gets it, they can export your audience or send campaigns. Treat it like a password.

One Key Per Integration

Create a separate key for each plugin or service. If you use Chimpmatic for Contact Form 7 and a different plugin for WooCommerce, give each one its own key. If one gets compromised, you revoke that key without breaking everything else.

Label Every Key

Mailchimp lets you add labels to each key. Use descriptive names like “Chimpmatic Pro – Live Site” or “Staging Server.” Six months from now, you’ll know exactly which key belongs to which integration.

GDPR and Data Privacy

If you collect subscribers from the EU, your API integration must respect GDPR consent requirements. Chimpmatic supports GDPR consent fields that pass the subscriber’s explicit opt-in directly to Mailchimp. Never add contacts to your list without documented consent — Mailchimp can suspend accounts that violate their terms.

How to Revoke or Regenerate a Key

You should revoke a key when:

  • A developer who had access leaves your team
  • You suspect a security breach
  • You’re switching to a different integration plugin

Go to Extras > API Keys and click “Revoke” next to the key. This disables it immediately — any integration using that key will stop working.

If you’re replacing a key, create the new one first, update your WordPress settings, verify the connection works, then revoke the old key. Never revoke first and create second — you’ll have downtime.

Troubleshooting “Invalid API Key” Errors

Extra whitespace when pasting

The most common cause. When you copy from Mailchimp, an invisible space can sneak in before or after the key string. Paste into a plain text editor first, trim both ends, then paste into WordPress.

Missing data center suffix

Your key ends with something like -us4 or -us20. This tells the API which Mailchimp server to connect to. If you cut it off, every API call returns “Invalid Key” because it’s hitting the wrong server — or no server at all.

Key is disabled or revoked

Check your API keys dashboard and confirm the key shows as active. Mailchimp may disable keys automatically if it detects unusual activity or if your account has a billing issue.

Wrong permission level

You need Admin or Manager permissions to generate keys. If you’re logged in as a Viewer or Author, the “Create A Key” button won’t appear. Ask your account owner to either elevate your permissions or generate the key for you.

Beyond the API Key: Audience ID and Merge Tags

Once your key is working, you’ll also need your Audience ID (sometimes called List ID) to tell Chimpmatic which list to subscribe contacts to. Find it under Audience > Settings > Audience name and defaults.

Merge tags like FNAME and LNAME let you map Contact Form 7 fields to Mailchimp fields. Chimpmatic handles this mapping automatically — see how subscriber name mapping works.

Ready to Connect?

Get Chimpmatic Pro and connect your Contact Form 7 forms to Mailchimp in under 5 minutes. Supports unlimited merge tags, subscriber groups, interest categories, and GDPR consent — all through the API key you just created.

Posted on

Mailchimp Required Email

In this article, you’ll learn why you are missing an [email-tag] in the email dropdown and why [email-tag] is required my Mailchimp.com

In order to send visitors information to Mailchimp.com, your form needs at least 1 important field. This field is the [email-tag], if this info is missing from your submission, nothing will be added to your mailing list inside Mailchimp.com.

To add a basic email field to your form you can copy and paste this snippet to your form: [email* your-email].

You can see this snippet in context here, this is the ‘Form Tab’ inside Contact Form 7:

Form

Once you have added this tag to your form, you will see it available from ‘Subscriber Email: *|EMAIL|* Required‘ dropdown:

ChimpMatic Lite API Key

Find your Mailchimp API here

Hit the Connect button to load your lists Learn More
Only [email-tags] will be displayed here as options:

MUST be an email tag Learn More

This may be sent as Name Learn More
If you need to add more fields, click on "Advanced Settings" and activate "Custom Fields":

This is all you need to start collecting contact information to Mailchimp using Contact Form 7.

If you need help or have questions, please use our LIVE CHAT feature during office hours or send us an email here.

Posted on

Mailchimp Subscriber Name FNAME

In this article, you’ll learn how to send information to your Subscriber Name FNAME field. You will get up and running in no time with Chimpmatic Lite.

To add a basic name field to your form you can copy and paste this snippet to your form: [text* your-name] .

You can see this snippet in context here, this is the ‘Form Tab’ inside Contact Form 7:

Form

Once you have added this tag to your form, you will see it available from ‘Subscriber Name – *|FNAME|* ‘ dropdown:

ChimpMatic Lite API Key

Find your Mailchimp API here

Hit the Connect button to load your lists Learn More
Only [email-tags] will be displayed here as options:

MUST be an email tag Learn More

This may be sent as Name Learn More
If you need to add more fields, click on "Advanced Settings" and activate "Custom Fields":

This is all you need to start collecting contact information to Mailchimp using Contact Form 7.

If you need help or have questions, please use our LIVE CHAT feature during office hours or send us an email here.

Posted on

MailChimp Double Opt-in

The Opt-in Checkbox feature was added to Contact Form 7 MailChimp Extension so you can give your visitors the option to opt-in / opt-out to subscribe to your mailing list(s).

Using the Contact Form 7 MailChimp Extension Opt-in Checkbox feature, is super simple. Take a look a the screenshots below:

To generate a form such as this one below:

Subscribe me your newsletter

Configure your form the same way you see it on this screenshot. Notice this mail tag inside the form: [checkbox my-optin “Subscribe me your newsletter”]

Form

Add this mail-tag [my-optin] to the settings of Contact Form 7 MailChimp Extension as in the screenshot below:

ChimpMatic Lite API Key

Find your Mailchimp API here

Hit the Connect button to load your lists Learn More

MUST be an email tag Learn More

This may be sent as Name Learn More
Add the mail-tag [my-optin] under Advanced Settings in the Required Acceptance text fields:
Required Acceptance
Required Acceptance

After these steps have been done, save your form and run some tests.

Posted on

MailChimp Opt-in Checkbox

The Opt-in Checkbox feature was added to Contact Form 7 MailChimp Extension so you can give your visitors the option to opt-in / opt-out to subscribe to your mailing list(s).

Using the Contact Form 7 MailChimp Extension Opt-in Checkbox feature, is super simple. Take a look a the screenshots below:

To generate a form such as this one below:

Subscribe me your newsletter

Configure your form the same way you see it on this screenshot. Notice this mail tag inside the form: [checkbox my-optin “Subscribe me your newsletter”]

Form

Add this mail-tag [my-optin] to the settings of Contact Form 7 MailChimp Extension as in the screenshot below:

ChimpMatic Lite API Key

Find your Mailchimp API here

Hit the Connect button to load your lists Learn More

MUST be an email tag Learn More

This may be sent as Name Learn More
Add the mail-tag [my-optin] under Advanced Settings in the Required Acceptance text fields:
Required Acceptance
Required Acceptance

After these steps have been done, save your form and run some tests.

Posted on

Sending Birthday Fields to Mailchimp

Mailchimp API accepts 2 formats for birthday – It does NOT include YEAR: MM/DD or DD/MM

Mailchimp Birthday Merge Fields

Once you choose your format, you can setup your form like this:

Mailchimp birthday mail-tags

Such settings will render a form like:

Mailchimp Birthday Form

You can map your birthday field inside Chimpmatic settings like this:

Mailchimp Birthday Form Settings

If all is set following the above steps, you can see the birthday info in Mailchimp.com:

Mailchimp Birthday Field

Posted on

Mailchimp Replace Groups Explained

Mailchimp Groups Explained (Chimpmatic + Contact Form 7)

Mailchimp Groups are built for preference-style organization: they let subscribers self-categorize into interest or preference buckets inside a single Audience. In Chimpmatic, you can map your Contact Form 7 (CF7) checkboxes and radio buttons directly to Mailchimp Group Categories—so the visitor’s choices become Group selections in Mailchimp.

SEO keywords: Mailchimp Groups WordPress, Mailchimp Groups Contact Form 7, CF7 Mailchimp Groups, Contact Form 7 Mailchimp integration, Chimpmatic Replace Groups, Mailchimp group categories, Mailchimp interests groups

What are Mailchimp Groups?

Mailchimp Groups are a special kind of audience field designed for organizing contacts by interests and preferences. Think of them as named options inside a category, like:

  • Group Category: “Hobbies”
  • Group Names (options): “Cooking”, “Running”, “Photography”

Groups are often used when you want subscribers to choose what they want—like newsletter topics, product interests, or communication preferences.

Groups vs Tags vs Segments (don’t mix these up)

  • Groups = structured preferences inside categories (great for “let the subscriber choose”).
  • Tags = flexible labels you apply (great for internal organization and events/behavior).
  • Segments = saved filters that pull contacts based on rules (can use tags, groups, fields, activity, etc.).

Practical rule: if the data is a preference center type of choice, use Groups. If it’s an internal label or event marker, use Tags. Use Segments to target combinations of either.

How Chimpmatic maps CF7 fields to Mailchimp Groups

Chimpmatic’s “Groups” screen is built specifically for mapping your form’s checkboxes and radio buttons to Mailchimp’s Group Categories.

What you see on the “Groups for [Form]” screen

  • Each row represents a Mailchimp Group Category (example: “Colors”, “Hobbies”, “Preferences”).
  • Chimpmatic shows the category’s internal ID and the category type (checkboxes or radio).
  • You choose which CF7 field should populate that category using the dropdown labeled “Choose…”.

What the mapping actually does

When a visitor submits your CF7 form:

  1. The visitor selects options in a checkbox or radio field on the front end.
  2. Chimpmatic reads those selected values.
  3. Chimpmatic sends those selections to Mailchimp as Group selections inside the mapped Group Category.

In other words, the visitor is effectively setting their Mailchimp “preferences” via your WordPress form.

The Replace Groups toggle (same behavior concept as Sync Tags)

The Replace Groups toggle controls whether Chimpmatic should replace a contact’s group selections with the new submission, or simply add selections without removing older ones.

Replace Groups = ON (replace)

Chimpmatic treats the submission as the new source of truth and replaces the contact’s group selections for the mapped Group Categories with the submission’s current choices.

Use this when group choices represent a current preference (newsletter topics, content interests, contact preferences).

Replace Groups = OFF (add)

Chimpmatic adds the selected group options but does not remove previous selections. This is less common for preference centers, but can make sense when you want “ever-selected” style accumulation.

Use this only when you understand the long-term effect: contacts may end up belonging to many group options over time.

Quick rule: Preferences → Replace ON. Accumulating history → Replace OFF.

Real examples (WordPress + CF7 → Mailchimp Groups)

Example 1: Newsletter topics (checkbox groups)

Mailchimp Group Category: “Topics” (type: checkboxes)

Group Names: “WooCommerce”, “Contact Form 7”, “Email Deliverability”, “Automation”

CF7 field: [checkbox topics "WooCommerce" "Contact Form 7" "Email Deliverability" "Automation"]

Mapping: Topics → CF7 “topics” checkbox field

Replace Groups: ON (subscribers update their topics)

Example 2: Preferred contact method (radio groups)

Mailchimp Group Category: “Preferences” (type: radio)

Group Names: “Email”, “SMS”, “Phone”

CF7 field: [radio contact-method use_label_element "Email" "SMS" "Phone"]

Mapping: Preferences → CF7 “contact-method” radio field

Replace Groups: ON (radio implies one active choice)

Example 3: Hobby list (checkbox groups)

Mailchimp Group Category: “Hobbies” (type: checkboxes)

CF7 field: [checkbox hobbies "Cooking" "Running" "Photography"]

Replace Groups: ON (user can change selections later)

Best practices (so Groups stay useful)

  • Keep Group Categories limited. Groups are for structured preferences, not everything.
  • Use groups for subscriber choices. If the subscriber should control it, groups are a great fit.
  • Match the Group Category type to the CF7 field type.
    • Checkbox category ↔ CF7 checkbox field
    • Radio category ↔ CF7 radio field
  • Don’t use Groups for personal data. Names, phone, address belong in fields, not groups.
  • Prefer Replace Groups ON for preference-center behavior to avoid “sticky” old preferences.

FAQ

Can contacts choose Mailchimp Groups themselves?

Yes. Groups are designed for self-categorization (preferences/interests) and often appear on signup or preference forms. Chimpmatic lets you collect those choices in WordPress via CF7 and send them to Mailchimp.

Why not just use tags instead of groups?

Tags are flexible labels (often internal). Groups are structured choices under categories and are commonly used as a preference center. If you want subscribers to select interests, Groups are usually the cleaner model.

What does Replace Groups do in Chimpmatic?

ON replaces group selections for the mapped categories with the latest submission. OFF adds selections without removing previous ones.

Can I segment campaigns by Groups?

Yes. In Mailchimp, group preferences can be used to build segments and target sends to specific interests.

Next step

  1. Create your Group Categories and Group Names in Mailchimp (example: Topics → WooCommerce, CF7, Automations).
  2. Build matching CF7 checkbox/radio fields with the same option names.
  3. In Chimpmatic, map each Mailchimp Group Category to the correct CF7 field.
  4. Set Replace Groups ON for preference-center behavior.
  5. Submit a test form and verify the contact’s Groups in Mailchimp.
Posted on

Mailchimp Sync Tags Explained

Mailchimp Tags Sync Explained (Chimpmatic + Contact Form 7)

Generate Mailchimp audience tags dynamically from Contact Form 7 submissions in WordPress—then choose whether to replace tags or add tags with one toggle.

SEO keywords: Mailchimp tags WordPress, Mailchimp tags Contact Form 7, CF7 Mailchimp tags, Contact Form 7 Mailchimp integration, Chimpmatic tags sync, auto-tag Mailchimp contacts

What this post covers

  • What the Chimpmatic Tags screen does
  • How CF7 mail-tags become Mailchimp Tags
  • What Sync Tags means (replace vs add)
  • Best practices for WooCommerce/WordPress sites (without creating tag chaos)
  • Real examples you can copy

What are Mailchimp Tags?

Mailchimp Tags are labels you apply to contacts inside your Mailchimp Audience. They’re commonly used for segmentation and targeting—like labeling contacts by interest, source, preference, or consent. Tags are not the same thing as merge tags (merge tags are placeholders used in email content personalization).

Common confusion: Tags organize contacts. Merge tags personalize email text. Different features.

How Chimpmatic turns CF7 submissions into Mailchimp tags

In Contact Form 7, each field can expose a mail-tag (example: [country] or [interests]). When a visitor submits the form, those mail-tags resolve into real values (whatever the visitor selected or typed).

Chimpmatic’s Tags screen lists the available mail-tags for your form (examples you might see):

  • [country] (select)
  • [contact-method] (radio)
  • [interests] (checkbox)
  • [referral-source] (select)
  • [GDPR] (checkbox)
  • Plus text/number fields like [first-name], [phone-number], [your-age], etc.

You can add these mail-tags to your Chimpmatic settings so that when a visitor chooses options on the front end, Chimpmatic sends those chosen values to Mailchimp as Tags.

Why this is powerful: You don’t need to manually tag contacts. Your form becomes a tagging engine—every submission can automatically categorize the contact for segmentation and automations.

The “Arbitrary Tags” field (static tags you always apply)

The Arbitrary Tags input is for tags you want applied on every submission—useful for consistent source tracking and lifecycle labeling.

Examples:

source:cf7, form:lalito, lifecycle:lead

You can also mix static text with mail-tags (dynamic values):

source:cf7, form:lalito, country:[country], ref:[referral-source]

That gives you predictable tags (like source:cf7) plus dynamic tags that match what the visitor selected.

Sync Tags toggle: Replace tags vs Add tags

This is the most important setting on the page.

Sync Tags = ON (replace)

Tags sent replace existing tags (for the tag set Chimpmatic is sending). This is ideal when tags represent a current state that can change over time.

  • Interests can change
  • Preferred contact method can change
  • Consent can change (depending on your workflow)
Use Sync Tags ON when you want Mailchimp tags to match the visitor’s latest submission.

Sync Tags = OFF (add)

Tags are added (appended). Chimpmatic won’t remove older tags. This is ideal when tags represent an event or milestone you want to keep forever.

  • Requested a quote
  • Downloaded a lead magnet
  • Attended a webinar
  • Purchased a product (WooCommerce)
Use Sync Tags OFF when tags should be cumulative—once added, they should stick.
Quick rule: Preferences → Sync ON. Events → Sync OFF.

Best practices: what should become a Mailchimp tag?

Tags work best for a limited set of repeatable values—things you’ll actually segment or automate on.

Recommended fields to tag

  • Select fields (SEL): country, referral source
  • Radio fields (RAD): contact method
  • Checkbox fields (CHK): interests, consent

Avoid tagging personal data

Even though the UI lists mail-tags like [first-name] and [phone-number], turning personal data into tags usually creates clutter and (depending on your policies) can be a privacy risk. Names/phone/address are typically better stored as Mailchimp fields rather than tags.

Avoid tag spam: Don’t generate one-off tags like “John”, “Maria”, or full street addresses. Tags should be categories, not identity.

Copy/paste examples for WordPress + CF7

Example 1: Lead form segmentation (recommended)

Goal: Tag leads by interests + source so you can send targeted follow-ups.

Arbitrary Tags:

source:cf7, form:contact, lifecycle:lead

Dynamic tags to include: [interests], [referral-source], [contact-method]

Sync Tags: ON (preferences may change)

Example 2: Quote request event tag (append-only)

Goal: Mark that a contact requested a quote (keep forever).

Arbitrary Tags:

source:cf7, form:quote, event:quote-request

Dynamic tags: optional [referral-source]

Sync Tags: OFF (event tags should not be removed)

Example 3: GDPR/consent tagging

Goal: Label contacts who checked your consent box.

Arbitrary Tags:

source:cf7, form:signup

Dynamic tags: [GDPR]

Sync Tags: ON (if you want the latest consent status reflected)

WooCommerce note: tags for customers (if applicable)

If you also tag WooCommerce buyers (orders, products, categories), those tags usually behave like events—meaning Sync Tags OFF is often the safer default so you don’t accidentally remove “purchased” history when preferences change later.

FAQ

Can Chimpmatic generate Mailchimp tags from Contact Form 7 fields?

Yes. Chimpmatic exposes your form’s CF7 mail-tags so you can include them in the Tags settings. When a visitor submits the form, those mail-tags resolve into real values and can be sent to Mailchimp as tags.

What does “Sync Tags” mean?

ON: tags sent replace the existing tags (for the generated set). OFF: tags are added (appended) and nothing is removed.

Which CF7 fields make the best tags?

Select, radio, and checkbox fields are best (country, referral source, interests, contact preference, consent). Free-text personal fields (name/phone/address) should usually not become tags.

How should I name tags so they stay organized?

Use consistent prefixes like source:, form:, interest:, pref:, event:. This prevents collisions and keeps your segments readable.

Next step

Open your Chimpmatic form integration, go to Tags, add a few static tags in Arbitrary Tags, then include only the dynamic CF7 mail-tags that have controlled values (interests/source/preference/consent). Decide whether you want Sync Tags ON (replace) or OFF (add) based on whether those tags represent preferences or events.

Tip for support docs: If a customer reports “too many tags,” it almost always means they tagged personal/free-text fields (names/addresses) instead of controlled option fields (checkbox/select/radio).

Posted on

Mailchimp Audience fields and *|MERGE|* tags

How to Find and Manage Your Mailchimp Audience Fields and *|MERGE|* Tags

To add, edit or remove Mailchimp fields and MERGE tags first you need to select your audience or mailing list inside mailchimp.com.

To find your Mailchimp audience or mailing list head to: https://admin.mailchimp.com/lists (Fig. 1).

mailchimp audience fields and merge tags
Fig. 1. In this screenshot you can see your Mailchimp audiences or mailing lists.

In this page you will see a listing of all your audiences, and from here you can select which one you will modify. In this example, we will choose our list Avengers:

Find Mailchimp audience fields and merge tags
Fig. 2. This is the page for the Avengers audience.

On the screenshot above you can see highlighted on yellow the link to reach the page that holds all your merge tags for this specific audience or mailing list. Click on it and lets go to the next page (Fig. 2):

mailchimp audience fields and merge tags
Fig. 3. These are the names of your merge tags inside Mailchimp.com settings area.

Here you can manage the fields available to your audience’s signup forms. As you can see, merge tags names are only capitalized LETTERS, NUMBERS or UNDERSCORES. No special characters or symbols (Fig. 3).

Please note that the merge tags names are FNAME, LNAME or MERGE2 and WEBSITE or MERGE3 – No Need to use these asterisks or pipes *||*

Posted on

Contact Form 7 Basic Setup

Contact Form 7 is a powerful WordPress plugin to help you to add contact forms to your WordPress site. This quick tutorial will help you to setup Contact Form 7 in less than 5 minutes!

We will work with 2 specific TABS in the settings page: the FORM tab and the MAIL tab.

1 – The FORM tab

This is the form tab, here you can add all the fields you need in your form. This specific form has 4 mail-tags:

[text* your-name], [email* your-email], [text your-subject]& [textarea your-message]

Form

2 – The MAIL tab

Step 1: Enable the Debug Logger included inside the MailChimp Extension tab, and click SAVE. This will help you to record some issues you are experiencing with this particular form.

Posted on

How to Install Chimpmatic Pro

Installing Chimpmatic takes just a moment. Just follow these easy steps:

  1. Install and activate Chimpmatic LITE: https://wordpress.org/plugins/contact-form-7-mailchimp-extension
  2. Install and activate Chimpmatic.zip from your account page: https://chimpmatic.com/my-account

Install and activate in the above order and you should be running Chimpmatic in under 2 minutes (Fig. 1).

wordpress mailchimp extension - How to Install Chimpmatic Pro
Fig. 1. In this screenshot you can see Chimpmatic installed and activated.

If you still have problems with it, please come and use our Live Help feature (NO BOTS).

Posted on

How To Use Mailchimp Groups

In this article, you’ll learn how audience groups help you organize your Contact Form 7 subscribers in Mailchimp.

If you don’t need to let your contacts categorize themselves, and you’re looking for a way to organize contacts internally, follow these steps:

1 – Generate your Groups category and Group names inside mailchimp.com